Полная версия:
Collins Complete Hiking and Camping Manual: The essential guide to comfortable walking, cooking and sleeping
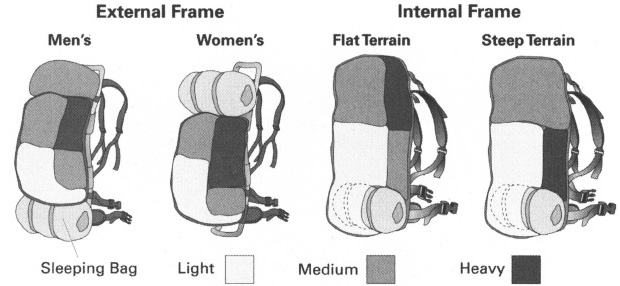
Internal Frame Internal-frame packs use a wide variety of materials—aluminum stays, carbon fiber, plastic sheets, and foam—to create a rigid spine to which the hip belt and shoulder straps are attached (see diagram). The pack bag runs the full height of the pack, although it may be divided into several compartments. Pack volumes range from 3,000 to 7,500 cubic inches (49 to 122 liters). Some internal-frame packs come in specific sizes based on the length of your spine; others are adjustable to fit a range of sizes. As with an external-frame pack, you should look for good lumbar padding, a conical hip belt, recurved shoulder straps with good padding, and a chest compression strap. A removable top pocket and a bivy extension (a fabric layer sewn around the top opening of the pack bag that, when pulled up, adds to the overall pack volume) on the pack bag will let you lift the top pocket and store more gear. Also, make sure that the pack has side compression straps to squeeze the pack down if you are carrying a smaller load. Pro: Good for carrying lots of weight. Conforms to the body for better balance. Generally more comfortable to wear for long periods. Con: Since the pack bag and frame are directly against your entire back, back perspiration can be a problem. Since the weight is carried lower in the pack, you may have to bend over more. You can’t put as much on the outside, so the overall carrying capacity of the pack is somewhat fixed by its internal volume. Tends to be more expensive than external frame packs.
Day packs Day packs typically forgo a frame and use a foam or plastic sheet for the back panel. This provides some rigidity and helps distribute weight to the hips (up to a point). How much of a frame you need depends on how much weight you plan to carry. For heavier weights, look for well-padded shoulder straps, a foam hip belt rather than just a webbing strap, and a chest compression strap. Day pack volumes range up to 3,000 cubic inches (49 liters).


If you are going ultralight, then the size and weight of your pack can decrease substantially. The ultralight approach means three things—bringing less stuff, bringing lighter stuff, which means less volume of stuff. That means that ultralight packs don’t need to be so large; most are under 3,000 cubic inches (49 liters). Since you are carrying less weight, the pack doesn’t need to have a huge and heavy frame system to transfer the weight, so it can be made of lighter weight material. Since you aren’t carrying 50+ pounds (110 kilograms), you don’t need all that padding on the hip belt and the shoulder straps—you might not even need a hip belt. You can just feel the pounds melting off.
Ultralight Internal-Frame Packs have a lightweight internal frame with simple shoulder straps and a foam or webbing hip belt. Most of these packs weigh between 1 and 3 pounds (0.4 to 1.3 kilograms).
Ultralight Rucksacks forgo a frame altogether. They are typically just a bag with shoulder straps and weigh a pound (2.2 kilograms) or less. By stuffing the inside full of your gear or by adding a rolled foam pad, you “build” enough of a “frame” to transfer the weight. Some have a very light hip belt or no hip belt at all. If you keep the weight low enough you can comfortably carry all the weight on your shoulders. Some are made of lightweight mesh to reduce weight.
PACK SIZE
Size is an important factor when selecting a pack. You need to make sure that you can adequately carry all the equipment and food you will need for the length of your trip. Keep in mind that the pack bags of external-frame packs are smaller than those of internal-frame packs. This is because there are spaces on the external-frame pack to strap large items directly to the frame. For example, a sleeping bag in a stuff sack may be anywhere from 700 to 1,500 cubic inches (11 to 25 liters). Here are some rough guidelines on pack size related to trip length:
Length of Trip External-Frame Pack Volume Internal-Frame Pack Volume 2–4 days 1,500+ cubic inches (25+ liters) 3,500+ cubic inches (57+ liters) 5–7 Days 2,000+ cubic inches (33+ liters) 4,500+ cubic inches (73+ liters) 8–10 days 3,000+ cubic inches (39+ liters) 5,500+ cubic inches (90+ liters)
TRICKS OF THE TRAIL
Buying a Pack When you go to the store and try on a pack, the salesperson will help you adjust it, and it will feel great. Then she will give you a few sandbags (25–30 pounds or 11–13 kilograms) to add some weight. Chances are it will still feel good. The real test is when you get home and try to carry 50 to 70 pounds (22–31 kilograms). Make sure that the store will take the pack back if it doesn’t feel right. I bought a pack once without doing this test until I hit the trail. With 60 pounds in the pack, the hip belt slipped off my butt and I ended up carrying most of the weight on my shoulders. I hiked in discomfort for days.
SIZING A PACK
It is essential to have a pack that fits properly. The major measurements are your spine length, waist size, and shoulder width to get a pack the correct length and one with the correct size hip belt and shoulder straps. Packs vary from company to company, so check the manufacturer’s instructions for both fitting and loading. Many packs come with different size hip belts and/or shoulder straps and some are specifically designed for women’s bodies. The idea behind a frame pack is to have the frame transfer most of the weight to your legs through the hip belt. Therefore, when fitting a pack, the place to start is with the hip belt. Here are some general fitting guidelines:
Put on the pack and adjust the hip belt to fit your hips. Wear the hip belt on the hip bones just underneath the rib cage. The center of the hip belt is about at the crest of your pelvis. The buckle will be about at your navel. Wearing the hip belt higher transfers weight onto major muscle groups. Wearing the belt too low on the hips can compress arteries and nerves and lead to poor circulation and numbness in the legs.
With the hip belt on and properly positioned, tighten the shoulder straps and note their position. Some packs will allow you to adjust the height at which the shoulder straps attach to fine-tune your fit. For an external-frame pack the straps should come off the frame about even with the top of your shoulders. If the straps drop too far down, the pack is too small, and too much weight will be pulled onto your shoulders. If the straps go too far up, the pack is too large, and too little weight will go onto your shoulders. For an internal-frame pack the frame stays or frame structure should extend 2 to 4 inches above your shoulders. The shoulder straps should follow the contour of your shoulders and join the pack approximately 2 inches (5 centimeters) below the top of your shoulders. The position of the shoulder harness can usually be adjusted. The lower ends of the straps should run about 5 inches (12.7 centimeters) below your armpits. On both types of packs be sure the width of the shoulder straps is positioned so that they neither pinch your neck nor slip off your shoulders. On the shoulder straps you may find load lifters that connect to the pack at about ear level and connect to the shoulder straps in front of your collarbone. These help pull the top of the pack onto your shoulders.
Some internal-frame packs allow you to bend the frame stays to adjust them to match the curvature of your back.
In both types of packs the sternum strap should cross your chest below your collarbone. If the pack is properly fitted, you can adjust the load lifters and other fine-tuning straps to make the pack hug your back. Adjustments can also be made while hiking, periodically shifting the weight distribution to other muscle groups, which makes hiking less tiring.
PACKING YOUR PACK
Loading an External-Frame Pack
The major consideration in loading a pack is how best to distribute the weight. There are two basic principles: for trail hiking over generally flat ground, the weight of the pack should be high and relatively close to the body. The heavier items should sit between your shoulder blades. For consistently steep or rough terrain, carry the weight lower to give you better balance and avoid falls from having a higher center of gravity. In this case, heavier things should be placed more toward the middle of your back. To achieve either arrangement, load the heavier, bulky items into the large top compartment in the position where you want most of the weight. Then fill this and the remaining compartments with lighter items. Tents and tarpaulins can be lashed to the extender bars at the top of the pack and sleeping bags can usually be lashed to the frame at the bottom of the pack. In either case, the horizontal weight distribution should be balanced so that the left side of the pack is in balance with the right. A woman’s center of gravity is generally lower than a man’s. So, for women, the heavier items should be placed close to the body but lower in the pack, as in the case for rough terrain, described above. Packs designed especially for women take this into account by lowering the pack bag on the frame. Load these packs as described above and then lash sleeping bags and tents or tarpaulins to the extender bars at the top of the packs.
Packing External- and Internal-Frame Packs
Loading an Internal-Frame Pack
Your gear will help form the structure of support for an internal-frame pack. For easy, level hiking, a high center of gravity is best. To achieve this, load bulky, light gear (e.g., your sleeping bag) low in the pack and stack heavier gear on top of it. For steeper terrain, a lower center of gravity is best because it lessens the chance of falls from a top-heavy pack. In this case, place heavier items a little lower in the pack and closer to your back than normal. Women may prefer this arrangement under all circumstances.
GENERAL PACKING SUGGESTIONS
Stuff your clothes into the pack or pack items in stuff sacks rather than fold them. This serves to fill all the available space of the pack better so that things don’t shift around and allows you to get more into the pack.
The more common weight distribution (general trail hiking) has the lighter, bulkier items on the bottom: the sleeping bag and clothes. The heavier items such as food, stoves, and fuel go into the upper section or on top of the pack, with the heaviest items closest to the pack frame. A general rule is that 50 percent of the weight should be in the upper third of the pack.
For consistently steep or rough terrain, carry the weight lower to give you better balance.
The horizontal weight distribution should be balanced so that the left side of the pack is in balance with the right.
Your hip belt should have enough room to allow you to loosen or tighten it for different layers of clothing beneath. If the belt is too loose, socks or shirts can be inserted between the belt and your body. This adds an extra layer of padding to the belt as well, which may increase the comfort of the fit.
Avoid hanging things all over the outside of your pack—no one wants to listen to you clank and clang your way down the trail; also, all that junk can snag branches. If you find yourself having to tie things on all the time, either your pack is too small or you are carrying too much (or both).
Think about the things you will need during the day and have them relatively accessible so that it doesn’t take a complete emptying of your pack to find lunch, the first-aid kit, or your rain gear. Also, group and store items according to function. For example, keep toiletries together. Small stuff sacks help organize your gear.
For protection from rain, line your sleeping bag stuff sack and main pack compartments with plastic rubbish bags. These can be reused on subsequent trips and recycled when you are through with them. They also work as emergency shelters. Pack rain covers are also useful.
Fuel bottles should be placed below any food items or in pockets on the outside of your pack.
How Much Weight?
How much weight to carry depends on your size, weight, and physical condition. The general rule for a multiday backpacking trip is to carry no more than 15 to 25 percent of your body weight. On longer expeditions or trips with more gear (such as winter camping), this figure may go up. The bottom line is, don’t carry more than you need or more than you can handle. Many a hiker has blown out knees, ankles, or back by hauling more weight than she could handle. Here are some things to do to make your trip as comfortable as possible:
Try on your loaded pack at home before you leave.
Fiddle with the pack and adjust it at home (you probably won’t take the time to do this at the trailhead while your friends are waiting).
Weigh your pack and compare that to your body weight. Figure out the percent of your body weight that you are carrying. Is it too much?
Take a good look at what you are bringing. Prune out any odd nonessentials.
Look and see what other people are carrying and how the whole group can share the load in a way that makes sense for each member, given size, weight, physical condition, and experience.
Checking Your Pack Before a Trip
Take a look at the shoulder straps, hip belt, and other compression and load-carrying straps.
Check all pack buckles.
Check all zippers.
Check the pack bag itself for rips or tears.
If the pack is an external-frame pack with a pack bag mounted onto the frame, check the attachment pins (typically clevis pins and split rings).
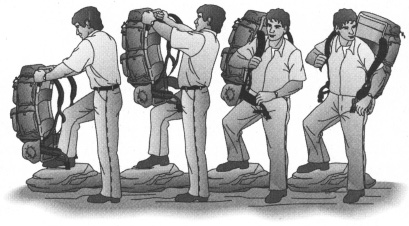
Putting on a Heavy Pack
There are a number of methods for putting on a heavy pack to avoid straining.
1 With the pack on the ground and the shoulder straps facing you, lift the pack up and rest it on one extended knee. Slide one arm through a shoulder strap. At this point, your shoulders will be slightly tilted, so that the shoulder strap is sliding onto your shoulder toward your neck. Lean forward slightly and rotate your body to swing the pack onto your back. Slide your other arm through the other shoulder strap. Adjust the hip belt first. The easiest way to do this is to bend over at the waist so the weight is being carried on your back rather than your hips and the hip belt is free to be snugged up tightly. Then you can straighten up and adjust the shoulder straps. Aim for 70 to 80 percent of the weight on your hips.
2 Follow the same technique with a friend to help stabilize your pack. This is especially helpful if you are carrying a large or very heavy pack.
3 Lift the pack up onto an object that is about waist high (rock, log). Stabilize the pack and slip your arms through both shoulder straps. Pull on the pack and tighten the hip belt.
Putting on a Pack
I don’t recommend putting your pack on while sitting on the ground and then trying to stand up. This can place too much strain on your lower back. Instead, ask a friend (or two) to pull you up.
SLEEPING EQUIPMENT
SLEEPING BAGS
When selecting a sleeping bag, you need to consider a number of factors. Unlike clothing layers, a sleeping bag doesn’t offer much in the way of ventilation to control your body temperature. As a result, you might have more than one bag: a summer-rated bag for hot conditions, a three-season bag for spring and fall, and a winter bag for serious cold-weather conditions.
Sleeping Bag Temperature Ratings
Sleeping bags come with temperature ratings to give you a general idea of how cold it can get and if the bag will still provide adequate insulation to keep you warm. These ratings are averages and should be used only as guidelines. Some people sleep “colder” than others, so you may need a bag with more or less insulation to be comfortable at a particular temperature. Also, ratings differ from manufacturer to manufacturer. To calculate the temperature rating you will need, look at the lowest normal temperature for the trip location and season you are going, and then subtract 10° or 15°F (9° or 12°C) from that temperature. This gives you a margin of safety in case the temperature is colder than expected. For example, if the usual nighttime temperature is 50°F (10°C), bring a bag that goes to about 35°F (2°C). Here are some general guidelines for sleeping bag ratings:
Season Temperature Rating Summer 40° to 60°F (4° to 16°C) Three-season 20° to 40°F (–6° to 4°C) Cold-weather 0° to 20°F (–17° to –6°C) Winter –30° to 0°F (–34° to –17°C)Sleeping Bag Styles
The following are three general styles for sleeping bags:
Mummy A form-fitting bag with a hood. The bag tapers in width from the shoulders to the legs, with little room. This snug fit means that there is less convective heat loss in the bag, making for a warmer bag. Mummy bags use less fill than comparable rectangular bags and will weigh less.
Rectangular Simple rectangular bag typically without a hood. These are the roomiest bags but also are heavier since they are just as wide at the feet as they are at the shoulders.
Semi-rectangular This bag is rectangular at the top without a hood and it tapers somewhat to the feet. It is not as warm as a mummy bag but provides more room, and weighs less than a comparable rectangular bag.
Specific Features to Look for
A hood allows you to insulate your head to prevent heat loss in cold weather. If this is a summer weather bag, a hood may not be necessary.
The draft tube is an insulated tube that runs along the zipper line and prevents cold spots at the zipper.
A draft collar provides a closure at the neck area to reduce the bellows action of heat leaving the bag. Good for cold-weather bags.
Well-designed zippers allow you to open and close your bag easily from the inside and allow some level of ventilation.
Sleeping Bag Fit
Fit is as important in a sleeping bag as it is in clothing. In sleeping bags, you want the bag to snugly conform to your body. If the bag is too big, you will have large spaces for convection currents and you’ll be cold. You might even need to wear extra clothing layers to help fill up the space. If the bag is too tight, the insulation may actually be compressed, decreasing its effectiveness. How comfortable you feel in the bag can also affect your night’s sleep—some people feel confined in a snug sleeping bag and need more “wiggle room” than others.
Insulation Types
When we talk about how warm a sleeping bag is, we mean the loft of the bag. Loft is the amount of dead air space created by the fill used in the sleeping bag. There are a variety of fills for sleeping bags, but they break down into two categories: synthetic fibers and down (see pages for details).
Sleeping Bag Care
Keep in mind that sleeping bags age. Over years of use, the fibers that create the loft in the bag break down and dead air space diminishes even though the bag stills weighs the same. This means that the bag is no longer capable of keeping you warm at its original temperature rating. Here are a few things you can do to prolong the life of your bag:
Stuff your sleeping bag into its stuff sack rather than rolling it. Rolling compresses and ultimately breaks the fibers in the same direction, decreasing loft faster. Stuffing is a random pattern of compression that helps your loft last longer.
Don’t keep your sleeping bag in its stuff sack between trips. Keep the bag unstuffed in a large breathable bag like a laundry bag.
Follow the manufacturer’s instructions for washing your bag and wash the bag only when necessary (repeated washings tend to reduce the loft of the bag).
Sleeping Bag Extras
Here are a number of sleeping bag extras that can be useful on your trip:
Sleeping Bag Liner Sleeping bag liners can serve as a lightweight cover for sleeping on top of your bag in hot weather. Tightly woven fabrics like silk can even work as mosquito netting. In cooler weather, a lightweight liner of Thermolite weighs only a few ounces and can add 10° to 15°F (8° to 9°C) of warmth to the rating of your bag. For long-distance hikers, you can mail the liner home when you no longer need it. Liners also can help keep the inside of your bag clean, reducing the number of times the bag needs to be washed.
Vapor Barrier Liner A vapor barrier liner can add about 10°F (9°C) to the rating of your bag by reducing evaporative heat loss. You may feel a little moist inside, so wear polypropylene or other hydrophobic wicking layers against your skin.
Bivouac (Bivy) Sack This waterproof outer shell can add 10° to 15°F (8° to 9°C) to the rating of your bag.
Overbag This is actually another lightweight rectangular sleeping bag cut to fit over a regular bag. Depending on the amount of insulation, an overbag can add 10° to 25°F (8° to 11°C) to the rating of your bag. A properly matched sleeping bag/overbag system can be a great combination. The overbag alone can be used for a summerweight bag. The sleeping bag alone can be used for fall and spring, and the combined bags can be used for cold weather (but may not be warm enough for a full winter trip).
TRICKS OF THE TRAIL
Sleeping Warm Your sleeping bag will be whatever the ambient air temperature is. Here are some tricks for warming things up before you crawl into your bag to sleep:
After dinner, fill a water bottle with hot water. Put the hot bottle inside your bag before you get in to preheat the bag. The water should stay warm all night. (Make sure you have a bottle that seals tightly.)
Get in your bag and do a bunch of sit-ups. The surge of body heat will warm you and the bag.
Change into dry clothing (like polypropylene) before getting into your bag.
Wear extra clothing, if necessary. How much clothing to wear in your bag depends on how much extra space there is around your body in the bag, whether you are adequately hydrated, and whether you sleep “warm” or “cold.” If there is space, wear extra layers to increase the dead air space around your body. Remember, you will need to warm up all your layers as well as the bag.