Полная версия:
The Times Beginner’s Guide to Bridge: All you need to play the game
Published by Collins
An imprint of HarperCollins Publishers
Westerhill Road
Bishopbriggs
Glasgow G64 2QT
First Edition 2015
Second Edition 2019
Previously published as Collins Need to Know? Bridge. Now with additional practice deals.
Source ISBN: 9780008343767
eBook Edition © October 2019 ISBN 9780008348984
Version: 2019-08-07
© Andrew Robson 2007, 2015, 2019
www.harpercollins.co.uk
The Times is a registered trademark of Times Newspapers Ltd
Front cover image © Shutterstock Allies Interactive
Inside card illustrations © Pascal Thivillon
All rights reserved under International and Pan-American Copyright Conventions. By payment of the required fees, you have been granted the non-exclusive, non-transferable right to access and read the text of this ebook on screen. No part of this ebook may be reproduced, transmitted, downloaded, decompiled, reverse engineered, or stored in or introduced into any information storage and retrieval system, in any form or by any means, whether electronic or mechanical, now known or hereafter invented, without the express written permission of HarperCollins.
Entered words that we have reason to believe constitute trademarks have been designated as such. However, neither the presence nor absence of such designation should be regarded as affecting the legal status of any trademark.
The contents of this ebook are believed correct at the time of publication. Nevertheless the Publisher can accept no responsibility for errors or omissions, changes in the detail given or for any expense or loss thereby caused.
The page numbers throughout this ebook relate to the printed version of this book; they do not match the pages of your ebook. You can use your ebook reader’s search tool to find a specific word or passage.
HarperCollins does not warrant that any website mentioned in this title will be provided uninterrupted, that any website will be error free, that defects will be corrected, or that the website or the server that makes it available are free of viruses or bugs. For full terms and conditions please refer to the site terms provided on the website.
If you would like to comment on any aspect of this book, please contact us at the given address or e-mail puzzles@harpercollins.co.uk.
To my mother and father, who got me started.
Andrew Robson, 2015
Dedication
To my mother and father, who got me started.
Andrew Robson, 2015
Contents
Cover
Title Page
Copyright
Dedication
Introduction
1 Appetiser
2 Basics
3 Core
4 Development
5 Scoring and systems
Further bridge resources
Glossary
Index
About the Author
About the Publisher
Introduction
Welcome to bridge
Bridge is possibly the best game devised by mankind – and certainly one of the most popular. But a word of warning: you’ll soon be hooked. Fortunately, this need not be expensive and will be good both for your brain and your social life.
First steps
This book will please complete beginners, as no assumption of prior knowledge has been made. It’s also suitable for those who play social ‘kitchen’ bridge and want to develop their game.
The first chapter (‘Appetiser’) starts from scratch. By the end of it you’ll understand the essence of the game and be able to play, though at a rudimentary level. Those who have played before may prefer to skim this part of the book. The second chapter (‘Basics’) gives guidelines for bidding and card play. Work through this and you’ll have done the equivalent of completing the eight-week beginner course at my bridge club. In the third chapter (‘Core’), each area of the game is considered in more detail, taking you to intermediate-level bridge. Chapter 4 (‘Development’) takes things further, revealing the ingenuity – and sheer beauty – of the game. Finally, you’ll find information on scoring in chapter 5, and details of different types of bridge and bidding styles.
My suggestion is to read chapters 1 and 2, then try to get some practice – even if it’s just dealing out cards by yourself (a very stimulating and productive thing to do). At this stage, although probably not the strongest player at the table, you’ll be able to play a perfectly adequate game of social bridge; best of all, you’ll be having fun. When you’re ready, move on to chapters 3 and 4, using chapter 5 as a reference when you want to know more about scoring.
must know
The best way to learn to play bridge is to set realistic goals, reinforce your knowledge and slowly build your skills. Most important of all is to enjoy playing.
A short history
A trick-taking game, bridge evolved from whist, which has been played for centuries. The first book devoted to whist, Edmond Hoyle’s Short Treatise, appeared in 1742 and became a bestseller.
No one knows the roots of the name ‘bridge’. It may have evolved from ‘biritch’, the name of a Russian game with similar rules, or possibly the Turkish term ‘bir uc’, meaning ‘one-three’ – as in one exposed hand and three concealed ones.
In 1903 British civil servants in India developed the practice of bidding for the privilege of naming the trump suit, thus introducing ‘Auction bridge’. ‘Contract bridge’, the universally played modern form, was only formally invented in 1925: not in a seedy back room, but on an American cruise ship under the guidance of Harold Vanderbilt. US marketer Ely Culbertson soon popularized the game, and by 1930 it was the society activity on both sides of the Atlantic. Since those first heady days, bridge has made front-page news – when a famous British pair, Reese and Schapiro, were accused of cheating in 1965. It has attracted film stars – Omar Sharif played at the top level – and featured in many books, perhaps the most famous of all being Ian Fleming’s Moonraker. Bill Gates and Warren Buffett are keen bridge players, and if they give just a small fraction of their wealth back to the game, we can look forward to a very bright future, especially as bridge is now more widely accessible than ever – via the internet.
Useful tip
Bridge is a ceaselessly fascinating and stimulating game. Start playing by partnering someone more experienced than you, who can help you get the most out of your play.
1 Appetiser
If you feel daunted by the complicated techniques and rules of bridge, just remember that it’s a game which can be enjoyed at any level. This chapter sets out the preliminary steps you need to make to have your first game of bridge.
The mechanics
Bridge is a partnership game. The ‘bidding’, the first phase of the game, establishes a target number of tricks to be made by each partnership. During the second phase, the partnership that wins the bidding tries to achieve their target number of tricks; the defending partnership tries to stop them.
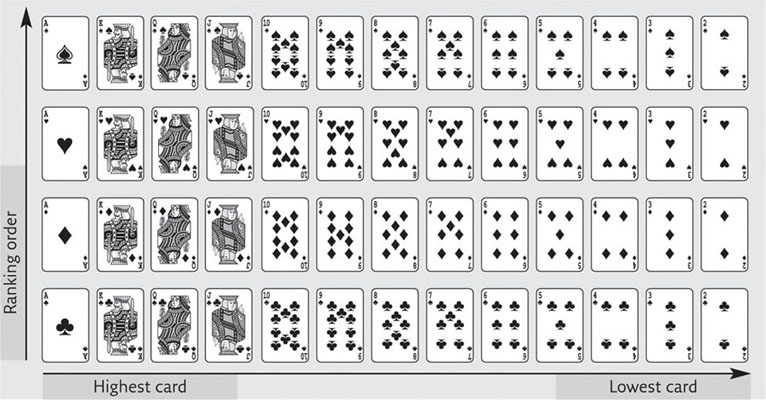
Cards and ranking
Bridge is played with a standard pack of cards. The ace is the highest (or best) card of each suit – the two is the lowest. The ranking of suits is in reverse alphabetical order, as shown in the diagram: clubs are ranked the lowest, then diamonds, hearts and spades – the highest. Most social bridge, or ‘Rubber Bridge’ (the different types of bridge are explained on pp. 228–31), is played with two packs of cards that are distinguishable by the colour (design) on the backs.
must know
Spades and hearts are the higher-ranking and higher-scoring suits, known as the ‘majors’; diamonds and clubs are the lower-ranking and lower-scoring suits, known as the ‘minors’.
Drawing for partners and dealer
Bridge is a game for four people (two partnerships) seated round a table. Their positions are often referred to as points of the compass: North, South, East and West. To decide on partners (if you don’t wish to choose), and who deals first, each player draws a card, placing it face up on the table. Whoever draws the highest card deals first, chooses where to sit and ushers the player who draws the second highest card to be their partner. Partners sit opposite.
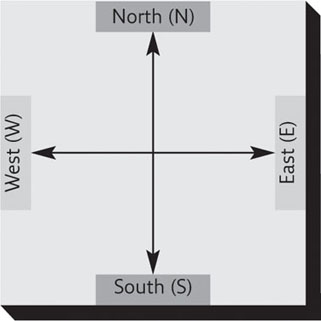
The position of partners at the table
must know
When drawing for partners or seats, the size of the card takes priority over the rank. Only when there are two same-size cards does the rank become relevant, for example the nine of hearts beats the nine of clubs.
Shuffling and dealing etiquette
The dealer chooses which of the two packs he wishes to deal. Before dealing commences, the opponent to the left of the dealer (LHO – West in the following example) shuffles the chosen pack and places it on the dealer’s left; meanwhile the partner of the dealer (sitting opposite) shuffles the other pack and places it on their right. The dealer then picks up the shuffled pack on their left, shuffles it again (this is optional) and passes it to the opponent on their right (RHO – East in the following example) to be ‘cut’. RHO cuts the pack by lifting (very approximately) half the cards, placing the top half on the table nearer the dealer and leaving the bottom half where it is. The cards are now ready to be dealt. The dealer takes the part of the pack furthest away from him and puts it on top of the closer part (known as ‘completing the cut’). He then picks up the pack (face down) and gives the top card (face down) to LHO, the next card to his partner opposite, the next to RHO, then one to himself, and so on in clockwise rotation, until all 52 cards have been dealt. The last card is always to the dealer.
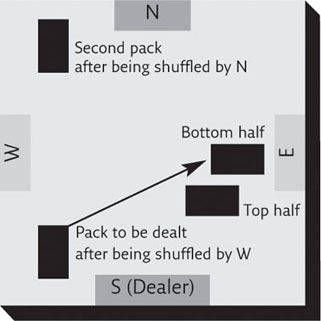
After the shuffle, showing South as the dealer; the pack is cut by East
When the next deal occurs (after all 52 cards have been played and 13 tricks won), this is done with the other pack. The new dealer is to the left of the previous dealer (in clockwise rotation). As before, the pack to be dealt is placed on the dealer’s left, shuffled by the person on their left, then cut towards the dealer by the person on their right.
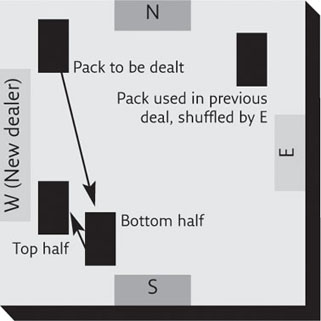
The next deal: West is the new dealer and South cuts the cards
Useful tip
Bridge etiquette can seem tougher than the real game, but master it and you’ll earn the respect of other players.
must know
It is poor etiquette to pick up your cards before the dealer has completed distributing all 52 cards.
A trick
Bridge involves taking tricks. A trick consists of one card from each player. Each player holds 13 cards, making 13 tricks per deal. The more tricks you and your partner win, the better; your side needs to win a minimum of seven tricks in the deal in order to score points towards a game (see pp. 220–4 for more on the points required to make a game).
One player has the lead for each trick, i.e. he or she plays the first card of the trick. For the first trick, the player on lead is seated to the left of the dealer; for the next and later tricks it is the player who won the previous trick.
After the opening lead, the play proceeds in clockwise order. If you hold a card in the same suit as the first card of the trick then you must play it (‘follow suit’). If not, you can play any card of another suit: unless it’s a trump card (see p. 12), a card of a another suit will not win you the trick so you will generally ‘throw away’ a low card.
The highest card in the lead suit wins the trick. If a trump card is played to a trick led in another suit, the highest card of the trump suit – rather than the highest card in the lead suit – wins the trick. Whoever wins the trick leads to the next trick.
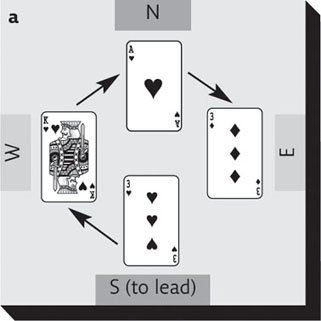
In the following example (a), East can choose any card to lead; he chooses ♥3. The other players must follow suit, i.e. play a card in the lead suit (hearts) – if they have a card in that suit. Play proceeds clockwise, with South playing second, West third and North last. West wins the trick and leads to the next trick.
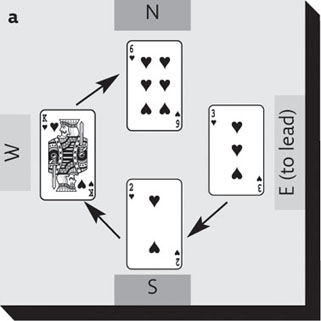
A trick won by West
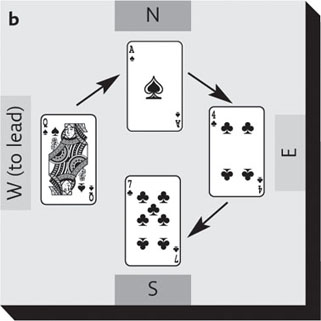
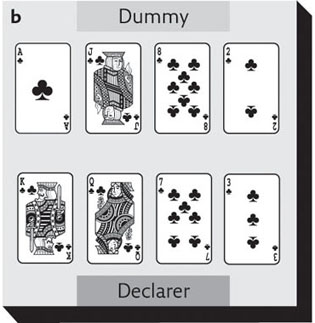
In the next trick (b), North plays the winning card, ♣Q. East, North’s opponent, plays a low card (♣4) because he doesn’t have a ♣K or ♣A to beat North’s ♣Q. South, on the other hand, would not waste a high card to overtake ♣Q because she is in partnership with North, who is already winning the trick.
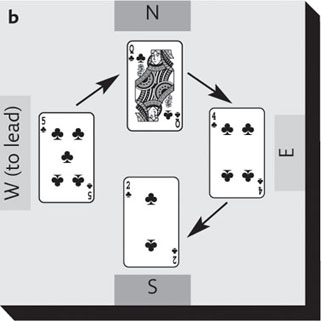
The next trick is won by North
must know
Everything in bridge is done clockwise, for example, dealing and play proceed in clockwise order – and bidding too.
A trump
Cards in the trump (or ‘boss’) suit outrank all other cards. The trump suit is determined during the first phase of the game – the bidding.
Look again at (a) on p. 11. Imagine that North is about to play the last card to the trick. There are two ways he can win this trick. First, if he holds ♥A then this will beat his opponent’s ♥K. Second, if he doesn’t hold ♥A, and he has no other hearts in his hand, then he can (but is not compelled to) play a card of the trump suit, if one has been chosen. With a trump card he will automatically win the trick, even if he trumps with the lowly two.
In the following example (a) diamonds are trumps and South (who won the previous trick) leads. When West’s ♥K is beaten by North’s ♥A, West’s partner, East, comes to the rescue: East has no hearts so can trump with ♦3, which wins the trick.
Trumps are diamonds
Overtrumping
If another player trumps, and you (also) have no cards in the lead suit, you have the option of overtrumping that player. In (b), clubs are trumps and West leads. South doesn’t hold a spade so can overtrump East’s ♣4 with ♣7, and win the trick. Note that if East had followed with a spade, South would not need to trump because his partner (North) would be winning the trick with ♠A.
Overtrumping with clubs as trumps
must know
Never lose sight of the fact that bridge is a partnership game – you play as a team with the person sitting opposite.
Your 13 cards – your ‘hand’
Once the cards have been dealt you can pick up your cards and sort them into suits. Place the highest card at one end of each suit, the lowest card at the other. Split up the colours (black-red-black-red or red-black-red-black) to avoid muddling the suits; hearts and diamonds are particularly easy to confuse.
The following diagram shows a typical bridge hand, in ranking order.
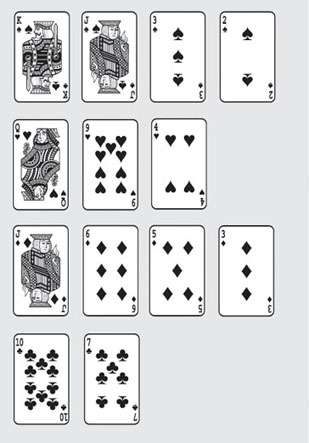
To save space, this will generally be represented as:

Notice the distribution, or ‘shape’, of the hand. It contains a four-card suit, a three-card suit, a two-card suit and another four-card suit. The number of cards in each suit determines the suit ‘length’ – a shorter length has fewer cards; a longer length has more cards. Rearranging the suit lengths, in the example we have a 4432 distribution. The more you play, the more you’ll realize that distribution is the key to bridge and can more than compensate for a low point score (see the following section).
Counting points
There is a unique method in bridge of evaluating the power of your hand – its trick-taking potential – based on the high cards. For each ace, the best card in the suit, you count four points, each king counts three, each queen is two and each jack (knave) one. No points are counted for tens and below.
As soon as you’ve sorted your hand and noted its distribution, you should count your points. There are 40 points in the whole pack – four aces, four kings, four queens and four jacks. The average number of points in any one hand is ten (one ace, one king, one queen and one jack). The hand in the previous diagram contains only seven points; if this were yours you should hope that your partner has a few more points.
Useful tip
Tens and nines may not count as points, but they are nevertheless potentially useful cards, and better than twos and threes.
Making tricks
The basic card-playing principles involved in making tricks are best learnt before tackling the bidding part of bridge – even though the bidding occurs first in practice. They will give you a feel for how many tricks to aim for at the bidding stage.
Counting tricks
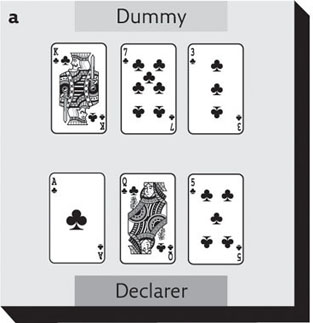
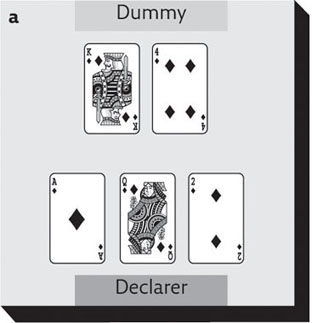
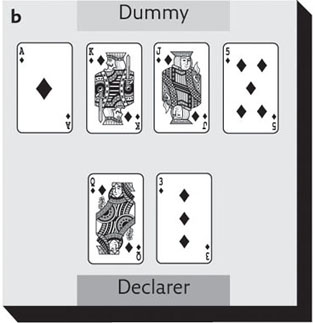
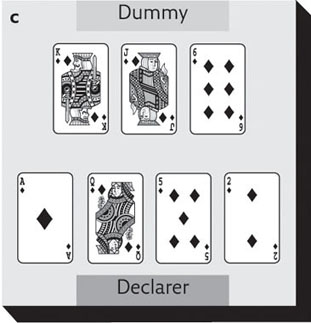
The partnership that wins the bidding contracts to make a certain number of tricks during the play phase of bridge. Within this partnership there is a ‘declarer’ and a ‘dummy’ (for more on these roles, see pp. 22–3). The declarer controls his own hand and dummy’s (his partner’s) hand, playing cards from both to try and achieve their trick target. In the following examples, imagine you are playing the role of the declarer and see how many tricks you can expect to make by playing out the suit in each case:
In (a), you can make three tricks if you play just one high card per trick. In (b), you can make four tricks by playing one high card for each of the four rounds. In (c), although you have the six top clubs, you must follow suit and can make only three tricks overall.

must know
Bidding occurs before trick-taking. It establishes:
• which (if any) suit is trumps;
• the trick target for each partnership;
• which player within the highest-bidding partnership is ‘the declarer’ and which is ‘the dummy’. The declarer controls both his hand and dummy’s.
Which order to take (‘cash’) the tricks
In the examples on p. 14, it doesn’t matter which hand is the declarer or the dummy, or from which you lead first. However, in many real-life cases, the order in which you play the cards is important if you want to make the maximum number of tricks available.
In (a), where there’s an unequal number of cards in the two hands, there are three available tricks to be made, one after the other, but only if you cash them in the correct order. If you play ♦A first (or ♦4 to ♦A), you will then have to lead ♦2 to ♦K – because the hand winning the previous trick always leads to the next trick – and will be stuck in the wrong hand, unable to win ♦Q. To avoid being ‘blocked’ in this way, lead ♦K (or ♦2 to ♦K) first, then follow with ♦4 to ♦AQ.
In (b), you should play ♦Q and ♦5 on the first round, then ♦3 to ♦AKJ. Only in this way can you make four consecutive diamond tricks.
In (c), lead ♦2 to ♦K (or ♦K to ♦2). Follow with ♦J and ♦5, then ♦6 over to ♦AQ.
Note that these examples assume your opponents do not have a trump card that would win the trick (more on the use of trump cards on pp. 18–19).
must know
The Unblocking Rule (a guideline for cashing winners in the right order):
• If leading from the hand with the shorter length, lead the highest card.
• If leading from the hand with the longer length, lead the lowest card.
• You may find it helpful to remember ‘L’ for ‘Lead Longest Lowest’.
Extra tricks by force
So far you have cashed your ‘top’ tricks and your opponents have not had a look-in. Now consider the next three examples. In each case you are missing a high, winning card (or cards), and in order to make tricks in the suit you must ‘force’ out that card from the opposition partnership.
In (a), you are missing ♠A and need to force it out from the opposition. You can use any high card in the suit to do this, then go on to win the other two high cards when you regain the lead. In this way you promote two tricks by ‘force’. Note that if your opponent withholds their ♠A on the first round, you’ll win the trick anyway, effectively ‘promoting’ the high card you use to lead. You can then sacrifice a second high card in order to promote the third. Both scenarios give you your two tricks.