Полная версия:
IPhone 13 Pro Max Camera Mastering

iPhone 13 Pro Max Camera Mastering
Smart Phone Photography Taking Pictures like a Pro Even as a Beginner
James Nino
© 2021 James Nino
All rights reserved.
This book or any portion thereof may not be reproduced or used in any manner whatsoever without the express written permission of the publisher except for the use of brief quotations in a book review.
You are welcome to join the Fan’s Corner, here
iPhone 13 Pro Max Camera Mastering
Smart Phone Photography Taking Pictures like a Pro Even as a Beginner
James Nino
Disclaimer
The advice and strategies found within may not be suitable for every situation. This work is sold with the understanding that neither the author nor the publisher is held responsible for the results accrued from the advice in this book.
All rights reserved. No part of this publication may be reproduced, distributed, or transmitted in any form or by any means, including photocopying, recording, or other electronic or mechanical methods, without the prior written permission of the publisher, except in the case of brief quotations embodied in critical reviews and certain other noncommercial uses permitted by copyright law.
Table of Content
Content Details
Introduction
Chapter 1: Introduction to iPhone 13
Chapter 2: iPhone 13 Pro Max Specs
Part One:
Beginner's Guide to Photography
Chapter 3: Getting Started
Chapter 4: Camera Modes
Chapter 5: Selfies
Chapter 6: Sharing Photos
Chapter 7: Basic Editing on iPhone 13
Chapter 8: Photographic Styles in iPhone 13
Part Two:
Intermediate's Guide to Photography
Chapter 9: Changing the intensity of the LED Flashlight
Chapter 10: ISO
Chapter 11: Focus Lock
Chapter 12: Camera Exposure
Chapter 13: Camera Grids
Chapter 14: Filters
Chapter 15: Switching Lenses
Chapter 16: Optical and Digital Zoom
Chapter 17: Aspect Ratio
Chapter 18: Guide to the Perfect Frame
Chapter 19: HDR
Chapter 20: Portraits
Chapter 21: Depth of Field
Chapter 22: Settings for Different Times of Day
Chapter 23: ProRes
Part Three:
Advanced Guide to Smartphone Photography
Chapter 24: Shutter Speed
Chapter 25: Aperture
Chapter 26: Filters Extended
Chapter 27: Editing for Pros
Chapter 28: Apple ProRaw
Chapter 29: Golden Ratio
Chapter 30: Rules of Thirds
Chapter 31: Adjusting to the Light
Chapter 32: Food Photography
Chapter 33: Landscapes
Chapter 34: Wildlife Photography
Chapter 35: Macro Photography
Chapter 36: City Photography
Chapter 37: iPhone Hacks
Conclusion
Content Details
Content Details 6
Introduction 12
Chapter 1: Introduction to iPhone 13 15
Chapter 2: iPhone 13 Pro Max Specs 18
Video Recording: 18
Camera Specs: 20
TrueDepth Camera: 22
Best iPhone for Photography 24
iPhone 13 Pro Max vs iPhone 12 Pro Max 25
Why iPhone 13 Pro Max is Only 12MP 26
Part One: 30
Beginner's Guide to Photography 30
Chapter 3: Getting Started 31
Chapter 4: Camera Modes 33
Chapter 5: Selfies 42
1. Lighting 42
2. Best Side 43
3. Filters 43
Chapter 6: Sharing Photos 44
Chapter 7: Basic Editing on iPhone 13 46
Cropping, rotating or flipping a photo or video 46
Straighten and Adjust Perspective 47
Adjusting the color and light 48
Trim a video 49
Setting the slow-motion part of a video 49
Revert an edited photo 50
Chapter 8: Photographic Styles in iPhone 13 51
Part Two: 55
Intermediate's Guide to Photography 55
Chapter 9: Changing the intensity of the LED Flashlight 56
Chapter 10: ISO 59
Chapter 11: Focus Lock 65
Chapter 12: Camera Exposure 68
Chapter 13: Camera Grids 72
Chapter 14: Filters 74
Chapter 15: Switching Lenses 76
Chapter 16: Optical and Digital Zoom 78
Chapter 17: Aspect Ratio 81
Chapter 18: Guide to the Perfect Frame 84
1. Composition 84
2. Visualization 85
3. Leading the Eye 86
4. Symmetry 87
Chapter 19: HDR 88
Chapter 20: Portraits 89
Chapter 21: Depth of Field 94
Chapter 22: Settings for Different Times of Day 96
Chapter 23: ProRes 101
Standard Video Format vs. ProRes 101
Part Three: 106
Advanced Guide to Smartphone Photography 106
Chapter 24: Shutter Speed 107
Chapter 25: Aperture 114
F-Stop and F-Number 116
Chapter 26: Filters Extended 123
Chapter 27: Editing for Pros 125
1. Exposure 125
2. Create Contrast 125
3. Cropping 125
4. Enhance Colors 126
5. Adjust Highlights 126
6. Fine-Tune Shadows 127
Chapter 28: Apple ProRaw 128
Chapter 29: Golden Ratio 131
1. Applicability of the Golden Ratio 132
2. The Scene 133
Chapter 30: Rules of Thirds 134
Chapter 31: Adjusting to the Light 137
Soft Light vs. Hard Light 140
Chapter 32: Food Photography 144
Chapter 33: Landscapes 149
1. Depth of field 150
2. Dominant Skies 150
3. A Tripod 151
4. Foregrounds 152
Chapter 34: Wildlife Photography 153
2. Manual Mode 154
3. Auto White Balance (AWB) 154
4. Know Your Subject 155
Chapter 35: Macro Photography 157
Mind the Aperture 160
Shutter Speed 162
Focusing 164
1. Photographing relatively large subjects 165
2. Photographing more minor subjects 167
3. Using a tripod 170
Chapter 36: City Photography 172
1. Minding the Exposure 172
2. Shutter Speed 173
3. Color Advantage 173
4. Shooting at Multiple Times 174
5. Include People and Buildings 174
7. Use a Polarizer 176
Chapter 37: iPhone Hacks 177
Candid Photos / Capture Using AirPods 177
View Photo/Video Details and Add Captions 178
Find Photos 100 Times Faster Using Photo Search 179
Preserving Old Photos with Duplicates 180
Conclusion 182
Introduction
The iPhone series is one of the most popular phones in the market, which makes it very difficult to overlook its exceptional capabilities, especially the cameras.
The cameras of the old iPhone series were exceptional. However, this time the iPhone has more than just doubled the overall capability. The iPhone 13 models have immense features, qualities, and the overall superb performance of its cameras.
With the new iPhone 13 Pro Max, many have started shooting movies, capturing amazing photos, and now even doctors are now using it for eye checkups. In spite of these magnificent capabilities, many of the features and abilities of the iPhone 13 Pro Max remain hidden except a conscious effort is made to learn how to use the phone by reading a book like this. The meaning behind this is anyone can point and shoot, but only a few can capture.
Taking photos and pictures isn't difficult, but to master them, is another story. That is why I am here to guide you on the best way to capture spectacular shots, and to show you what being a photographer means.
A few quick notes before diving in:
1 Even if you think that you know the basics of the iPhone, it is better not to skip any part. That said, the book is designed in such a way that you can skip to any part of the book you want to.
2 Practice as much as you can, otherwise, you will not improve
3 Do not be afraid to experiment with settings because there is always a reset button in the camera options. If you don't know what each option does, then how can you fully utilize iPhone 13 Pro Max's full capability?
4 iPhone 13 is brimming with features, and I mentioned all of those here. Hence, make sure to read each chapter to find new features, tricks, and tips.
5 This guide is not just about how you can capture pictures with the iPhone 13 but how you can excel at it and know all about the art of photography itself.
Chapter 1: Introduction to iPhone 13
iPhones are Apple's trademark series and what they are mostly known for. iPhone 13 Pro Max is the latest one in the series, and having some superb camera upgrades, this might be one of the best mobile devices for photography in the market.
Competing with Androids, they have always been in the top ten or three lists. Each new release of the iPhone introduces new features, and this time with the launch of the iPhone 13, they have included camera upgrades like Portrait mode video, updated filter systems, ProRes, and so much more. Moreover, the camera is comparatively bigger and can capture 47 percent more light than the iPhone 12.
With such huge improvements and additions, iPhone 13 Pro Max has a complete arsenal of marvelous items waiting for them to be utilized. The iPhone 13 Pro Max has significant advancements, such as the most sophisticated dual-camera system ever seen on an iPhone — with a new Wide camera with larger pixels and sensor-shift optical image stabilization (OIS) that improves low-light images and movies.
Along with Photographic Styles, a new method to personalize the camera, and Cinematic mode, which adds a new level to video storytelling. The iPhone 13 and 13 mini also have A15 Bionic for better performance, low power consumption, and longer-lasting battery life. The brighter Super Retina XDR display gives you better colors, which is incredibly useful when capturing and editing photos.
Moreover, it has enhanced durability with the Ceramic Shield front cover. The basic storage is double (128GB) as compared to older iPhones. It also boasts an IP68 rating for water resistance. In terms of connectivity, it has an exceptional 5G experience.
The iPhone 13 represents a significant breakthrough in camera design, with computational photography advancements and one of the best hardware resulting in outstanding images and movies.
The new Wide camera is the largest sensor ever built on an iPhone dual-camera system, with 1.7 m pixels, and can capture 47 percent more light. This results in brighter images and less noise. Sensor-shift OIS, which debuted on the iPhone 12 Pro Max and is not present in any other smartphone, is now available in the Wide camera. It stabilizes the sensor rather than the lens, resulting in more stable pictures.
The custom-designed Ultra-Wide camera with a new sensor captures images with better information in the dark parts of photographs and movies with less noise.
Chapter 2: iPhone 13 Pro Max Specs
So before telling you about anything, it would be best if you knew the qualities the iPhone 13 Pro Max possesses, because it would help you take photographs or capture videos better if you know what you are utilizing.
Video Recording:
● HDR video recording with Dolby Vision up to 4K at 60 fps
● Cinematic mode: Recording videos in 1080p @30 fps having a shallow depth of field
● 4K Video Recording: 60 fps. 30 fps, 25 fps, or 24 fps
● HD 720p video recording @30 fps
● HD video recording 1080p at 60 fps. 30 fps, 25 fps
● ProRes: Up to 4k @30fps Video recording (for 128GB storage device it is in 1080p @30 fps)
● Optical image stabilization sensor-shift for video (Wide)
● For video, Dual optical image stabilization (Telephoto and Wide)
● 6x optical zoom range; 2x optical zoom out, 3x optical zoom in
● Audio zoom
● Up to 9x Digital zoom up to
● True Tone flash
● Slo-mo video supports 1080p at 240 fps or 120 fps
● QuickTake video
● Time-lapse video having stabilization
● Video stabilization in Cinematic mode (4K, 720p and 1080p)
● Night mode having a Time-lapse
● Continuous autofocus in video
● Playback zoom
● While capturing 4K video snap 8MP stationary photos
● Video formats supported: H.264 and HEVC
● A Wide color (P3)
● Stereo recording
● Standard: 1000 nits maximum brightness; HDR: 1200 nits maximum brightness
● 2,000,000:1 contrast ratio (typical)
Camera Specs:
● HDR display
● ProMotion technology along with adaptive refresh rates (max 120Hz)
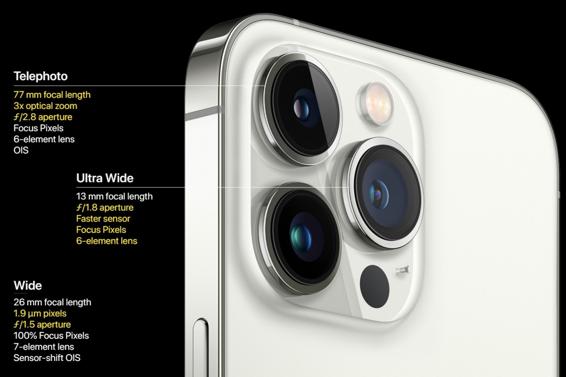
● Camera system (12MP Pro Max): Ultra-Wide cameras, Wide, and Telephoto
● Wide Aperture: ƒ/1.5
● Telephoto Aperture: ƒ/2.8
● Ultra-Wide Aperture: ƒ/1.8 and field of view is 120°
● Up to 15x Digital zoom
● 6x optical zoom range; 2x optical zoom out, 3x optical zoom in
● Portraits in Night mode possible by LiDAR Scanner
● Portrait Lighting in six effects: Studio, Natural, Contour, Stage Mono, Stage, High-Key Mono
● Portrait mode in advanced bokeh and with Depth Control
● Dual optical image stabilization: Wide and Telephoto
● The lens with Six-elements: Ultra-Wide and Telephoto; Lens with Seven-elements: Wide
● Optical image stabilization using sensor-shift (Wide)
● True Tone flash along with Slow Sync
● Up to 63 MP Panorama
● Wide Focus Pixels 100%
● Deep Fusion
● Night mode
● Smart HDR 4
● Macro photography
● Photographic Styles
● Apple ProRAW
● Lens correction in Ultra-Wide
● Wide color capture in Live Photos and Photos
● Advanced red-eye correction
● Image stabilization (Auto)
● Photo geotagging
● Image formats captured: JPEG and HEIF
● Burst mode
TrueDepth Camera:
● Portrait mode in advanced bokeh and with Depth Control
● Aperture: ƒ/2.2
● Portrait Lighting in six effects: Studio, Natural, Contour, Stage Mono, Stage, High-Key Mono
● Night mode
● Memoji and Animoji
● Deep Fusion
● Photographic Styles
● Smart HDR 4
● Apple ProRAW
● Video recording in HDR up to 4k @60 fps with Dolby Vision
● Recording videos in the cinematic mode at 1080 @30 fps with shallow depth of field
● HD video recording 1080p at 60 fps. 30 fps, or 25 fps
● Video recording 4K at 60 fps. 30 fps, 25 fps, or 24 fps
● Video support in slo-mo in 1080p @120 fps
● Up to 4K @30 fps ProRes video recording (For 128GB storage devices, it is in 1080p @30 fps)
● Time-lapse video along with stabilization
● Video stabilization in Cinematic mode: 720p, 1080p, and 4K
● Time-lapse in Night mode
● QuickTake video
● Lens correction
● Wide color captures support for Live Photos and Photos
● Retina Flash
● Burst mode
● Auto image stabilization
All iPhone 13 models have the same MPs, which means even iPhone 13 Mini has the same MPs as the iPhone 13 Pro Max does.
Best iPhone for Photography
There are considerable differences as you move from Mini to Pro Max in iPhone 13. Previously iPhones mostly varied only in pictures and not in videos.
However, a lot has changed this time as iPhone 13 Pro Max gets an exclusive feature called ProRes. The sensor in the new iPhone 13 Pro Max models has an increased surface area to light ratio, which enables it to capture more detail than previous versions.
The 1/1.65" size improves pixel granularity by 84% over last year's model while also increasing image resolution by 25%.
iPhone 13 Pro Max vs iPhone 12 Pro Max
● Wide (primary) camera: Both cameras are 26mm, f/1.5 on 13 Pro Max versus f/1.8 on 12 Pro Max.
● Telephoto camera: 13 Pro Max has a 3X zoom and 77mm lens, whilst the 12 Pro Max has a 2.5X zoom.
● Ultra-wide camera: Both cameras are 13mm, f/1.8 on the 13 Pro Max versus f/2.4 on the 12 Pro Max.
● Night Mode Exposure: Because of the bigger sensor and wider aperture, the iPhone 13 Pro Max can use night mode with a 1-second exposure instead of a 3-second exposure on the iPhone 12 Pro Max.
The iPhone 13 Pro Max models have an edge on its standard and Mini model:
● The primary camera sensor is more significant, having 1.9m pixels and a wider F1.5 aperture.
● F2.8 77mm equivalent '3x' telephoto lens with PDAF and OIS.
● It is equipped with an upgraded ultra-wide lens with a wider F1.8 aperture for enhanced low-light performance and AF for Macro shooting.
All of this suggests, and it is also proven that iPhone 13 Pro Max is the best iPhone for photography.


Why iPhone 13 Pro Max is Only 12MP
Each brand names its lenses differently, with hundreds of acronyms possible per maker. For example, other phones have an astonishingly high number of megapixels, but iPhones still use 12MP.
The definition of a megapixel is that it is a unit of graphic resolution equivalent to one million; for example, a 12MP camera has twelve million pixels. However, a more significant number of megapixels certainly do not mean it is better, and this is because of several reasons:
1 Quality vs. Quantity: It's easy to get lost in the sea of pixels when you're viewing a high-resolution photo or video. However, the size of each pixel matters.
The size of each pixel is measured and represented with μm, which stands for microns; however, smaller amounts with greater size mean better image quality because they have fewer colors per unit area that can be displayed on the screen at any given time - leading us towards higher resolutions!
For example, 1mm has about four times as many color combinations available as 0.8μm does.
1 A 108MP is equal to 12MP: iPhone Pro Max's 12MP camera takes the same pictures as 108MP in low light conditions. A 108MP camera has a more significant number of pixels, but the actual size of them is low.
It means that these higher megapixel cameras capture less light. Hence, they bind multiple pixels to make a single pixel. It means 9 pixels act as a single pixel.
If you do the math, then 9x12=108. Hence, a 108MP camera is equal to a 12MP camera of your iPhone 13 Max.
1 More battery life low processing times: A fewer pixels means less data to process overall than higher megapixels. It results in extended battery life and lower processing times. Because in the end, this is a phone that a user has to do a lot of things with and not just capture images and make videos.
It does not mean that 108MP cameras are utterly useless; they have their advantages and use cases. However, the 12MP camera in iPhone 13 Pro Max is adequate for users, at least until these phones' computational powers and battery life are not increased to a level where these cameras are supportable.
Chapter 3: Getting Started
Following extensive research into cinematography and the full utilization of rack focus, the new Cinematic mode on the iPhone helps you record videos of people, objects, and pets with a gorgeous depth effect.
Moreover, the automatic focus changes, allowing anyone to capture cinema-style moments, even if they aren't professional filmmakers. Users can modify the degree of bokeh they want even in the iMovie for iOS and as well as the Photos app. It will soon be available in iMovie for Final Cut Pro5 and macOS. Hence, it makes the iPhone 13 Pro Max one of the few devices capable of editing the depth-of-field effect in the video after recording.
The Cinematic mode for iPhone 13 Pro Max is capable of recording videos in Dolby Vision HDR. Most of which is due to A15 Bionic and sophisticated machine learning algorithms. Both versions also enable HDR video recording with Dolby Vision - from capturing, editing, and sharing - with all of it in 4K up to 60 fps. The faster Neural Engine powers All-new features in the iPhone 13 Pro Max with A15 Bionic.
Photographic Styles enable users to apply their unique picture preferences to each image while still using Apple's multi-frame image processing. Pre-set and personalized choices operate across scenes and subjects. Unlike a primary filter, automatically apply the correct modifications to different image sections to ensure vital features, such as skin tones, are retained.
The dual-camera setup and computational photography capabilities allow Smart HDR 4 to have enhanced color, lighting, and contrast for each subject in a group shot.
Moreover, this is predominantly used in difficult lighting situations, making photos more true-to-life and an upgraded Night mode. And the TrueDepth camera is compatible with all the excellent new camera capabilities, such as Cinematic mode, Smart HDR 4, Photographic Styles, and others.