Полная версия:
Home Chef

home Chef
Neven Maguire

This book is dedicated to my mother, Vera, who gave me her love and appreciation for food. I’ll be forever grateful.
CONTENTS
Cover
Title Page
Introduction
Chef’s Skills
Bread
Canapés, Soups & Starters
Main Courses
Desserts & Petit Fours
Drinks
Larder
Index
Acknowledgements
Copyright
About the Publisher
Introduction
The work involved in producing a book is always exciting. But this one has been especially important for me. I have now had 32 happy years in this world and have been cooking professionally for half of them. I have enjoyed every minute and cannot imagine any other life except that of being a chef. That is the kernel of this book. The aim of Home Chef is to help give people the confidence to cook at a high level in their own home, from everyday family meals to dishes with a generous helping of the ‘wow’ factor.
When I think back to my early training days, I realise how my cooking has changed over the years and how the knowledge of my customers has developed. There are many people out there who are deeply interested in food and wine and very knowledgeable about what they eat and how it is prepared. Sometimes, diners in the restaurant tell me about meals where they each cooked a different course from my previous books. It is always interesting to hear how people use my books and so it is vital that my recipes are tried and tested to ensure that people get real pleasure from the results. I had these cooks very much in mind when deciding on material for Home Chef and developing recipes that would produce good results for readers. I hope this book will work well for everyone.
I remember my first week in catering college: I cut vegetables for the entire time, forcing me to learn knife skills before cooking a single thing. As a result, I’ve included in this book the bits of information that I think of as the building blocks of good cooking – what to look for when buying knives, what to keep in your larder, and essential skills such as filleting fish. I want Home Chef to be a one-stop resource to help readers know what to request from their butcher, local growers, or at the farmers market. There is also a chapter full of sauces and dressings that you can make, keep, freeze and then use when needed. With so many people cooking at home, this will help them to buy in and prepare ahead.
No one wants to be stuck in the kitchen all day – that’s my job! Guests at the restaurant want a memorable meal. They don’t just want a piece of beef – they want it cooked in four different ways. This is okay for me with nine chefs in the kitchen, but no good for the home cook. I have given the recipes a lot of thought so that you can manage the dishes at home and at the same time flex your culinary muscles. I hope this is a book that you will keep on coming back to and get good use from over the years. What I really want is for everyone to cook something really delicious to eat with family and friends. If Home Chef helps you to do this, I will be well satisfied.
Happy Cooking!

Using This Book
There are recipes in this book for all abilities and I’ve tried to include ways for more confident cooks to stretch their skills a little further. The level of each recipe is shown by the number of chef’s hats beside it:
Straightforward
Intermediate
Stretch your Skills Further
If you’re nervous about trying some of the more advanced recipes, you can always make just the main part of the dish, and save the accompaniments or sauces for when you’ve had a bit more experience. Don’t forget to refer to the glossary on pages 34-6 if there are words or phrases that you’re not familiar with.
Oven Temperatures Timings and temperatures are given for fan ovens. If you’re using a conventional oven, increase the temperature by 10 degrees.
Eggs All recipes were tested using medium-sized eggs (size 3). Try to use free-range or organic eggs wherever possible. Look out for the Bord Bia Quality Assurance mark; in the UK, look out for the Lion Quality mark.
Herbs Unless otherwise stated, all herbs used in the recipes are fresh.
Chef’s Skills
Store Cupboard Essentials
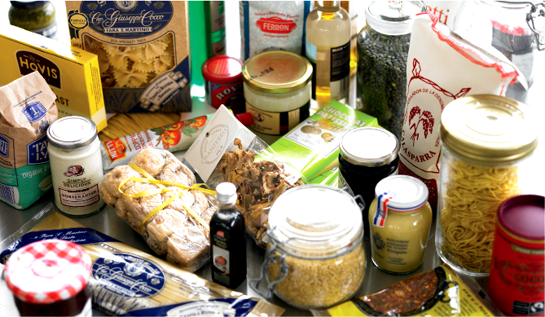
One of the best-kept secrets of the clever cook is a well-stocked larder. From basic essentials such as eggs and milk to handy convenience foods like Mexican flour tortillas, if you keep yourself well organised, you’ll never run short of ideas when it comes to preparing tasty food. Of course, I have many items in my store cupboards, some of which you might not need, so either omit them or swap them for similar items that you prefer – after all, cookery is all about experimentation and personal taste.
Whatever you do decide to put in it, keep your store cupboard tidy -regularly throw out items that are out of date and arrange things logically. I always put little stickers on the tops of my spice jars so that I can find the one I want without having to rifle through every single jar. Try to buy spices in small quantities as ideally they should be replenished every six months or so.
Canned foods
Chopped plum tomatoes
Sweetcorn kernels
Chickpeas
Coconut milk (I buy all my oriental ingredients from a company called Thai Gold. They are available by mail order and in Irish supermarkets)
Tuna
Anchovies
Black olives
Baked beans
Fresh goods
Spring onions
Tomatoes
Garlic
Onions
Potatoes
Celery
Carrots
Oranges and lemons
Bread: soft flour tortillas; sliced bread; longer-life part-baked breads such as Italian ciabatta
Bottles and jars
Sunflower oil
Olive oil
Extra virgin olive oil
Toasted sesame oil
Duck/goose fat
White wine and red wine vinegar
Balsamic vinegar
Soy sauce (light and dark)
Tomato ketchup
Wholegrain and Dijon mustard
Worcestershire sauce
Tabasco sauce
Sweet chilli sauce
Thai fish sauce (nam pla)
Sun-dried tomato paste
Tomato purée
Roasted red peppers
Horseradish sauce
Capers
Mayonnaise
Clear honey
Nutella
Toffee sauce
Jam
Vanilla extract (not essence)
Wine: red; white; sherry; port; brandy
In the fridge
Milk
Eggs
Butter
Double cream, crème fraîche and Greek yoghurt
Mascarpone cheese
Parmesan
Mature Cheddar
Smoked streaky bacon
Parma ham Wild rocket
Chilli Jam (for homemade, see page 215)
Red Onion Marmalade (for homemade, see page 209)
Port and Balsamic Syrup (for homemade, see page 214)
In the freezer
As well as buying ready-frozen items, I like to freeze these handy time-savers:
Root ginger: much easier to grate when frozen. Peel 2.5cm (1in) pieces and wrap in freezer film before freezing
Herbs: leftover fresh herbs can be put in strong plastic bags and stored in the freezer. They’re ready for cooking with at any time, so when you need them, just pull off a handful and crumble into the pan – no need to chop
Bread: most bread freezes very well, particularly in individual slices ready for putting straight into the toaster
Stock: freeze stocks in 600ml (1 pint) rigid plastic containers and allow to thaw before using
Galangal, kaffir lime leaves and curry leaves: freeze any leftovers in small strong plastic bags and use straight from the freezer
Garden peas
Vanilla ice cream
Pastry: puff, shortcrust, filo and kataifi (for more info see pages 70 and 216)
Spring roll wrappers
Wonton wrappers
Dried goods
Baking powder
Bicarbonate of soda
Flours: plain, strong plain, self-raising and wholemeal
Dried yeast sachets
Spaghetti
Pasta shapes e.g. penne / tagliatelle (I prefer the De Cecco brand)
Egg noodles
Rice: long grain, basmati, risotto and organic brown
Couscous
White beans, such as haricot
Polenta
Dried mixed wild mushrooms
Popcorn kernels
Digestive biscuits
Plain chocolate (at least 70% cocoa solids)
Sugar: caster, light muscovado and icing
Stock cubes (The Kallo brand are good and also low in salt)
Maldon sea salt
Herbs and spices: black peppercorns, ground cumin, coriander, paprika, cinnamon, Chinese five-spice, cayenne, dried chilli flakes, curry powder and paste, cloves, saffron and vanilla pods
Dried fruit: raisins/sultanas, apricots, prunes
Nuts: flaked almonds, pine nuts and pecan nuts
Sesame seeds
Fresh Herbs
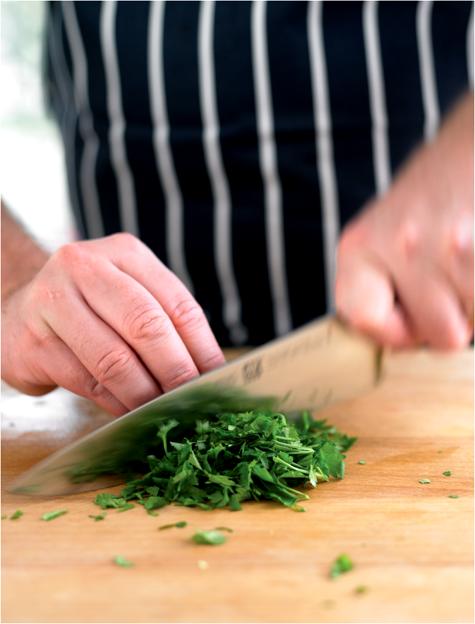
Herbs contribute hugely to my enjoyment of food. I use them to add scent, flavour and colour to almost every dish that I produce in the kitchen. It’s hard to imagine cooking without them. The flavour of each herb comes from the essential oils stored in its leaves, stems and flowers, which are released as the leaf is cut, torn or heated. To illustrate this, pick a leaf of basil, sage or tarragon and crush between your fingers. Notice how much more pungent and powerful the smell becomes. I’d like to say I grow all my own herbs, but I am lucky enough to have two local organic growers who deliver to me regularly. They pick the herbs at about 6.30am, when the plants are holding the most moisture. However, I do grow some mint in the garden and always have a pot of basil on the windowsill in my kitchen. Always add chopped herbs right at the end of the cooking or they will discolour and their flavour may change. I keep herbs in a bowl of water until the last minute to prevent them wilting.
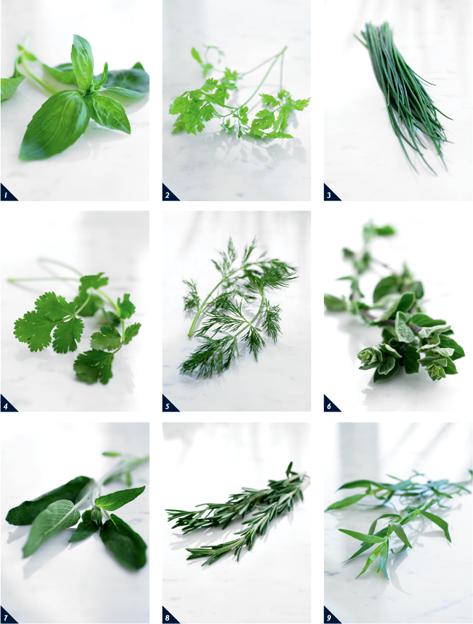
Basil
No other herb brings the flavour of Mediterranean cooking into your kitchen in quite the same way. Its warm, spicy smell and flavour livens up a tomato salad, or it can be pounded with Parmesan, pine nuts and olive oil to make pesto (see page 208). If you are using it raw, it is better to shred the leaves by hand as this helps retain the flavour. There are several varieties: sweet, which I cook with; purple for garnishing; Napolina, which has leaves nearly the size of your hand and is best for pesto; and Thai holy basil (basil in name only, as not technically from the same family), which is perfect in oriental dishes.
Bay leaves
The strong and distinctive flavour of bay is best released by lengthy cooking. It is part of the classic bouquet garni. We use bay leaves in court-bouillon (see page 34), stocks (see pages 218-19), casseroles and pot roasts.
Chervil
Its delicate anise flavour is ideal in salads, soups, stews and sauces. Use in any recipe calling for ‘fines herbes’, and with white meat. Excellent in herb butter. Avoid prolonged cooking as this destroys the flavour and colour.
Chives
Use in dressings, as a garnish or chop into summer salads. The flowers look great in salads. Chives are essential in potato salad and can be used in egg dishes or to flavour butter for barbecuing. They tend to discolour, so add at the very end of cooking. Onion- and garlic-flavoured chives are also available.
1. Basil
2. Chervil
3. Chives
Coriander
Use in Middle Eastern and Asian dishes. It’s especially good scattered on top of curries, and is best added towards the end of cooking. The roots and stalks can also be ground down and used in curry pastes and marinades.
Dill
This has a mild caraway flavour and is best added just before serving. Use in fish marinades, sauces, soups and salads. I also find it particularly good with potatoes, chicken, fish and egg recipes.
Marjoram
This has pungent leaves and flowers. Hang small bunches in a warm, dry place to dry out, then store in labelled screw-topped jars in a dark cupboard and use in homemade tomato sauces or to flavour tomato pulp for pizzas. Marjoram makes a good addition to a marinade, particularly for fish. We use fresh marjoram in the restaurant as part of our special herbal tea – a wonderful mixture of bronze fennel, apple mint, lemon thyme, lemon balm and marjoram. The tea aids digestion and has the most fantastic fragrance.
4. Coriander
5. Dill
6. Marjoram
Mint
Many flavours of mint are available, including peppermint, ginger, apple and pineapple. Toss with new potatoes or peas, or serve as a sauce with roast lamb. It is wonderful in summer drinks and fruit salads or serve with ice cream and your favourite summer berries. We serve freshly brewed mint and peppermint tea in the restaurant and both are very popular.
Parsley
There are two kinds of parsley: curly parsley and the continental flat-leaf parsley. Both have a vivid green colour and although the continental variety has a more pronounced flavour, they can be used interchangeably in almost any savoury recipe. Parsley is the most used herb in my kitchen. Finely chop with garlic and mix with butter to put on top of mussels, to flavour grilled meat or fish, or simply to mix with vegetables.
7. Sage
8. Rosemary
9. Tarragon
Rocket (common or wild)
This old-fashioned salad herb is enjoying a great revival. It has a spicy flavour and makes an excellent simple salad or can be quickly cooked in a little olive oil. In Italy it is often served with carpaccio: thin slices of raw beef with Parmesan shavings and a dribble of olive oil (see page 92) but it is equally good with slices of smoked salmon.
Rosemary
A very strongly flavoured herb, so use sparingly. It’s often finely chopped in stuffing for poultry, meat and game. I also like to insert sprigs into roast lamb or pork – remove them before serving. Occasionally we use rosemary in sweet dishes such as creams, custards or poached fruit (such as pears).
Sage
Not subtle, but very versatile, this can be used fresh or dried and is excellent combined with tomatoes, olive oil and garlic. It works well with fatty meats like pork or duck, or, as is traditional in Italy, with offal such as kidneys and liver. Some of the best stuffed pasta dishes of the Italian Modena region are served simply with melted butter and sage leaves.
Tarragon
Its delicate aniseed flavour goes well with chicken. Considered by the French as one of the most important culinary herbs, this is an essential ingredient of béarnaise sauce. A few sprigs make a nice addition to pot-roasted chicken, or infuse in vinegar to make a vinaigrette.
Thyme
One of the most important and widely used herbs, which comes in a variety of flavours. It has an intensely aromatic flavour, perfect in slow-cooked dishes, such as casseroles. Thyme is an ingredient of the bouquet garni, together with parsley and bay. A couple of sprigs of lemon thyme work well tucked into a whole salmon or trout, or try stuffing the cavity of a roast duck with orange thyme.
Equip Yourself
The first step to becoming a successful home chef is to keep your kitchen well equipped. You don’t need a lot of gear, but it makes sense to buy the best you can afford, then you know it will work for you and last a decent amount of time. Below left are the essential items that everyone should own, while the handy extras on the right are things I use less often. You might choose to buy only some of these, but I like to have them all to hand as they save me time and effort and help me to create stunning results.
The Basics
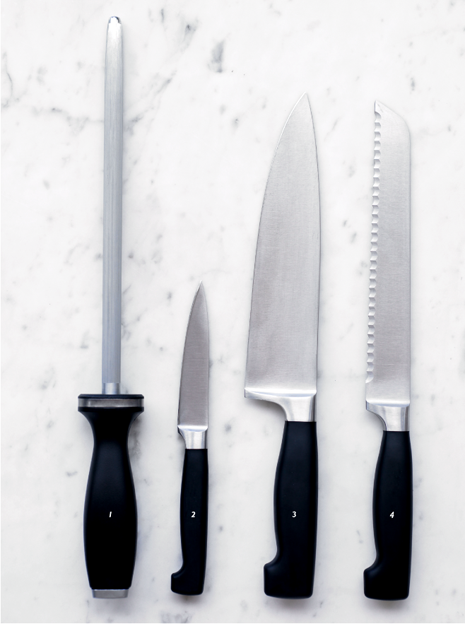
1 large sharp knife (Cook’s knife)
1 small sharp knife (Paring knife)
1 bread knife
1 chef’s steel/knife sharpener
Can opener
2 chopping boards
Large non-stick frying pan
3 sizes of heavy-based saucepans
3 wooden spoons (or I use heatproof Mafter exoglass spoons)
Set of kitchen scales
Colander
Measuring jug
Metal hand whisk
Metal sieve
Slotted spoon
Fish slice
Potato masher
Swivel-style vegetable peeler
Box-style cheese grater
Pastry brush
Rolling pin
Roasting tin
Baking sheet
Casserole dish with lid
Tiered bamboo steamer
Cast-iron griddle pan (with metal handle)
Handy Extras
Lemon zester
Lemon juicer
Tongs
Tweezers (for boning fish)
Potato ricer
Palette knife
Hand-held blender (my preference is Bamix)
Food processor
Kitchen scissors
Wok
Rubber spatula (heatproof)
Flour dredger
Chef’s blowtorch
Nylon sieve (for straining fruit, as some fruits react with metal)
Mortar and pestle
Measuring spoons
6 ramekins (try to build up a selection of different sizes)
6 dariole moulds (castle-shaped ramekins, narrower at one end)
Microplane grater (try to build up a selection of different blades)
Fluted round cutters (in various sizes)
Chef’s rings — 10cm (4in), 6cm (2½in) and 5cm (2in)
Disposable piping bags and nozzles
23cm (9in) loose-bottomed cake tin
Muffin tin and mini-muffin tin
Knives
Although you can get by with just the three knives listed on page 17, a full set of good knives is the best investment a keen cook can ever make. I recommend buying the most expensive set of knives you can possibly afford, because they should last for the rest of your life. I use Henckel knives, which are available from most good cookware shops, department stores and online.
When choosing a knife set, one of the most important factors to consider is the type of steel used to make the blades. The majority of knives are manufactured from a blend of high-carbon stainless steel that resists rust and corrosion and is dishwasher-proof. The ‘tang’ is the part of the knife where the metal is attached to the handle. The best knives will have a tang in which the metal visibly extends inside the handle, right to the end.
Good-quality knives are well balanced and feel good in the cook’s hand. Don’t be afraid to try holding them in the shop. They should be easy to handle and should feel solid, not flimsy. As a general rule, a good knife should feel like an extension of your own hand and should allow adequate space between the point where your fingers grip the knife and the surface on to which you are cutting. Once a month, we get someone to come into the restaurant to sharpen our knives, but a good butcher should be happy to do this for you – they normally have machines which will do a good job in seconds. You can also sharpen the knives yourself using a sharpening steel (see page 21 for instructions).
If you do decide to invest in a set of knives, the ones listed overleaf are the basic set with which I would begin. It’s also worth getting a knife block so that the knives can be kept in a safe place and are easily accessible. It helps prevent them from getting damaged or ruined.
1. Sharpening steel
2. Paring knif
3. Cook’s knife
4. Bread knife
Cook’s Knife
This is the knife I use most often and which I could never do without in the kitchen. Its 26cm (10½ in) blade gives me the perfect balance between handle and blade, allowing excellent hold – perfect for chopping vegetables or herbs.