Полная версия:
Incredible artificial intelligence Easy Diffusion 3.0. The Middle and High School Guide

Incredible artificial intelligence Easy Diffusion 3.0
The Middle and High School Guide
Alexander Chesalov
Illustrator Vsevolod Chesalov
Illustrator Diana Chesalova
Cover designer Alexander Chesalov
Illustrator Chesalov Alexander
© Alexander Chesalov, 2024
© Vsevolod Chesalov, illustrations, 2024
© Diana Chesalova, illustrations, 2024
© Alexander Chesalov, cover design, 2024
© Chesalov Alexander, illustrations, 2024
ISBN 978-5-0062-7082-4
Created with Ridero smart publishing system
Gratitude
I thank all the people who are involved in the development of the Easy Diffusion generative artificial intelligence system. Your work helps people understand how artificial intelligence works, as well as discover new creative abilities in themselves.
Introduction
The wonderful world of Artificial Intelligence can be fully revealed to us only when you and I can see the positive results of its work, especially those created with our direct participation. These results must be understandable and explainable to everyone, and they must also be ethical, unbiased and not violate the law.
Today, Artificial Intelligence can do a lot, for example: write the text of a new poem or even a whole story, reproduce it in different voices of famous actors or musicians, analyze a large amount of numerical data and make a forecast for the future, play computer games with us or with a thousand people at once games. Perhaps the most impressive thing, in my opinion, that Artificial Intelligence can do today is create unique and incredible images. These images can be the embodiment of a three-dimensional world of a fantastic future in a computer game or be a virtual simulation of the world around us. The images can be three-dimensional or two-dimensional, and can also be made in various painting styles by famous artists from different time periods. But the most interesting thing is that these images may contain creatures or objects that do not exist in our world.
In this book, you will acquire new knowledge about how diverse Artificial Intelligence can be, and you will become familiar with its most popular terms and definitions. You will learn what is «artificial superintelligence», «narrow Artificial Intelligence», «friendly Artificial Intelligence», «human-centered Artificial Intelligence», «distributed Artificial Intelligence», «trusted Artificial Intelligence», «composite Artificial Intelligence», «explainable» Artificial Intelligence» and much more.
I will tell you how you can transform and visualize the knowledge you have acquired using an Artificial Intelligence system, turning the text definitions of various terms from this book into fantastic drawings.
In order to bring all this to life, we will study the work of a free program – the Easy Diffusion generative Artificial Intelligence system. This program creates photorealistic images from text queries and graphic images.
Easy Diffusion is an easy-to-install assembly (distribution) of the Stable Diffusion Artificial Intelligence system. Easy Diffusion will allow us to create unique images based on the most popular neural network models today, such as Stable Diffusion, Midjourney, OpenJourney, DreamShaper, SDXL Yamer’s Realism!, ProtoVision XL, Art Universe, Realistic Vision and many others.
With the help of this book, you will learn not only how to use Easy Diffusion Artificial Intelligence as a creative tool, but you will also be able to independently install, configure and uninstall this program on your computer, connect various additional modules to it, which will significantly expand its capabilities for creating and processing images.
With the help of Artificial Intelligence, you will learn to create unique and inimitable images that you can use in your studies or for entertainment.
In order to be objective in my work and make the book as accessible as possible to a wide range of readers, I asked my son Vsevolod (5th grade student) and my daughter Diana (8th grade student) to help me work on the textbook and create various images that reflect the essence of the definitions of Artificial Intelligence presented in the book. It was interesting for me to involve them in a new activity for them, and it was also very important to understand for myself how quickly they would learn to work with the Easy Diffusion Artificial Intelligence system and be able to create their own high-quality images.
It turned out that fifteen minutes of instruction was enough to begin their first acquaintance with Easy Diffusion Artificial Intelligence and become familiar with the work of the Realistic Vision model. Their first image was a steampunk style hamster. Steampunk is a science fiction movement incorporating technology and arts and crafts inspired by technology and 19th century science fiction1. Nevertheless, they gained more or less serious experience working with Easy Diffusion after some time.
It took us more than six weeks of work to fill this book with illustrations. From more than five hundred drawings, we have selected for you the most, in our opinion, impressive and interesting. The total computer time we spent working with the Easy Diffusion Artificial Intelligence is approximately three hundred and sixty hours. What can we say about the fact that writing the book itself, correcting and editing the text, as well as selecting the necessary pictures required a lot of time and effort.
Almost six months have passed since the first edition of this book was published. During this time, more than seventeen thousand readers became acquainted with the first edition of this book. Since then, the version of the Easy Diffusion program has also changed.
This book is written as a textbook for middle and high school students. It contains detailed instructions for working with the Easy Diffusion 3.0 Artificial Intelligence system, which allows you to transform the text you write or your image into a new unique image. It also contains educational information about existing types of Artificial Intelligence. The book features a beautiful set of over one hundred illustrations demonstrating the AI capabilities of Easy Diffusion 3.0.
We really hope that our positive and positive experience that we received in the process of studying the Easy Diffusion Artificial Intelligence system will be useful to you in your studies and creativity.
Enjoy your reading and productive work!
Artificial intelligence Easy Diffusion: first steps
Step 1. Most popular programs
Today, there are quite a large number of different programs that, based on Artificial Intelligence technologies, create incredibly beautiful images.
In my opinion, the following programs are the most popular:
– Midjourney is a very popular Artificial Intelligence system created by the company of the same name, Midjourney. Artificial Intelligence Midjourney is a web service on the Internet that allows you to create very beautiful images without using the computing resources of your computer. To use it, you must have Discord installed – a convenient messenger for group work, which is often used by players around the world. The main drawback of the program is that not so long ago Midjourney became completely paid.
Program website:
https://www.midjourney.com
– Leonardo.Ai is a colorful web service on the Internet that provides access to the Leonardo.Ai neural network of the same name. With it, you can create images from text and other images. The advantages of Leonardo.Ai include an easy-to-use interface. The disadvantage is the limitation on the number of images created per day. Images are created very quickly and with high quality, but it will take a lot of time until you learn how to make something high-quality. If you want to spend more time working with this program, be prepared to pay for its services. Very often Leonardo.Ai is compared to Midjourney, but which one is better is up to you to decide.
Program website:
https://leonardo.ai
– Dreamstudio.ai is a web service created by Stability AI, which has developed one of the most famous neural networks or, as they say, «models» called Stable Diffusion. The web service is very convenient and allows you to create any images very quickly. This is because Dreamstudio.ai uses very powerful computers provided by Stability AI. In other words, your computer is not involved in the process of creating images, which is a significant advantage of the program. At the same time, the disadvantage of using Dreamstudio.ai is the limitation on the number of images created.
Program website:
https://beta.dreamstudio.ai/dream
– Stable Diffusion Web UI is a web-based program that you can install directly on your computer. Its advantages include the fact that it is a completely free option for using the Stable Diffusion model. The program allows you to choose flexible settings to improve the quality of the image and convert it to a new version or create another image based on it. Disadvantages include some difficulties associated with installation and the need for you to have additional knowledge of the programs necessary for its operation (for example, such as Python and Git). Stable Diffusion can be recommended to all those users who have already gained extensive experience with Easy Diffusion.
Program websites:
https://github.com/AUTOMATIC1111/Stable-diffusion-webui
https://www.python.org/downloads/windows/
https://git-scm.com/download/win
https://Stablediffusionweb.com/#demo
– Stablecog is a very easy to use, but at the same time very interesting web service. Unfortunately, it’s paid. However, you can create twenty free images per day. I liked it because out of ten models you can choose two created by our compatriots. These models are called Kandinsky and Kandinsky 2.2. In addition, you can increase the resolution of the created image four times (for example, from 1248x832 to 4992x3328).
Program website:
https://stablecog.com/generate
– Easy Diffusion is a completely free Artificial Intelligence system that combines the capabilities of using Midjourney and Stable Diffusion. Easy Diffusion offers you a convenient and simple web interface that allows you not only to create very beautiful images, but also to connect various additional modules and models to its work. By default, the program already has the well-known Stable Diffusion model preinstalled. Additionally, you can download many other models from www.civitai.com, including the «Openjourney» model, which will allow you to replace the use of Midjourney. Another advantage of the program is that it is very easy to install on a computer or laptop and works with not very powerful video cards. The only drawback of the program is the time it takes you to create images. For example, if an image in “Dreamstudio.ai” is created in 20 seconds, then in Easy Diffusion it can take up to 120 seconds to create.
Once again, I would like to draw your attention to the fact that Easy Diffusion is an easy-to-install assembly of software packages (or, in other words, a distribution kit) of the Stable Diffusion Artificial Intelligence system for various operating systems. Here and further, I will not talk about Stable Diffusion, but rather Easy Diffusion due to the fact that it is with this distribution and program that we will work.
Program website (program distribution):
https://github.com/easydiffusion/easydiffusion
Step 2. Install Easy Diffusion
In order for us to install the Easy Diffusion program, follow the following link and download the required distribution for your operating system (MS Windows, Linux or MacOS):
https://github.com/easydiffusion/easydiffusion

There are three distributions on the program page:
• For MS Windows operating system.
• For the Linux operating system.
• For the MacOS operating system.
Before installing the program, please pay attention to the minimum requirements for your computer. You must have:
– Video card from NVIDIA with 2 GB of RAM (better with 4 GB). A laptop video card will do, but keep in mind that you must have the latest drivers installed not only for the video card, but also for all components of the MS Windows system.
– The minimum amount of computer RAM is 8 Gigabytes.
– The minimum amount of disk space (either on the «C:\” drive or on any other drive) is 40 Gigabytes (25 for Easy Diffusion and 15 for models). I recommend installing the program on a computer flash drive (not an external drive, but an internal drive of a computer or laptop). It will make image creation faster.
Next, we will consider installing Easy Diffusion on a computer with the MS Windows operating system.
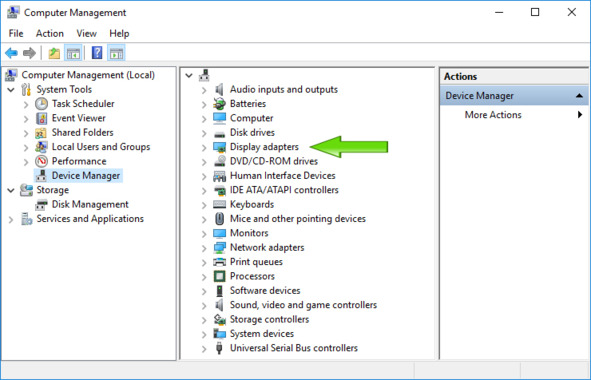
Before installing, you need to make sure that everything is in order on your MS Windows system. To do this, you need to right-click on the «My Computer» icon and select the «Manage» command from the context menu. The Computer Management program will open, and in the Device Manager section you will see not only all the devices on your computer, but also their operating status. If there is a malfunction of any of the devices, you need to install new drivers for this device. You can find them on the Internet.
Next, download the Easy-Diffusion-Windows program.
After downloading the file named Easy-Diffusion-Windows, launch the installation and click the «Next» button:

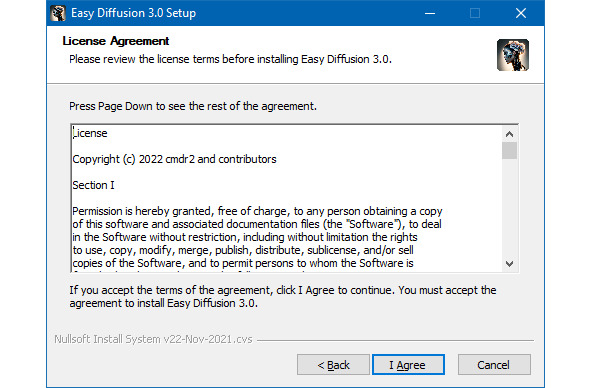
We agree to the license agreement and click the «I Agree» button:
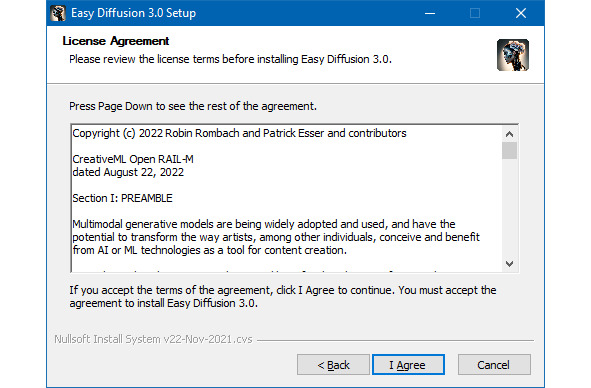
Click the «I Agree» button again:
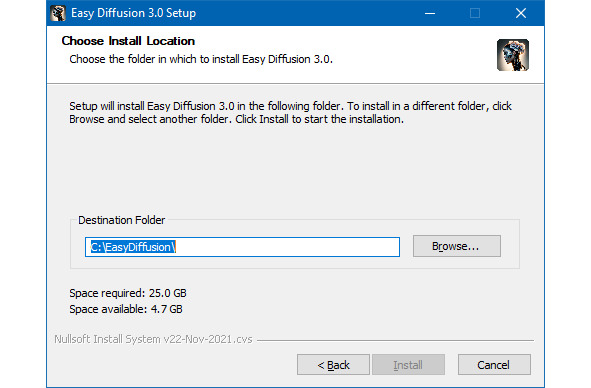
Select the disk on which the program will be installed. The main recommendation is that the program should be located in the root of the disk, that is, it should be installed on the disk, but not inside other folders, but only in its own.
For example, on the drive C:\EasyDiffusion\, as shown in the image below:
Or on drive D:\EasyDiffusion\, as shown in the image below:
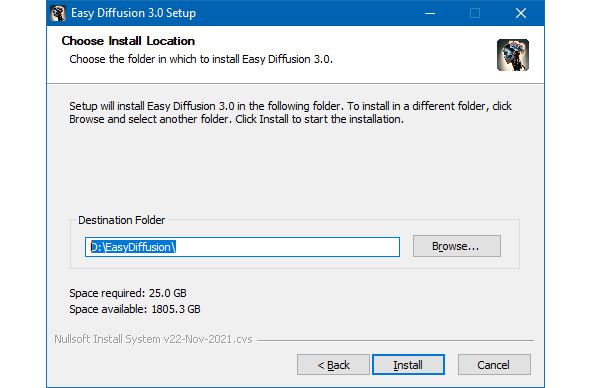
Select the disk you need and click the «Install» button.
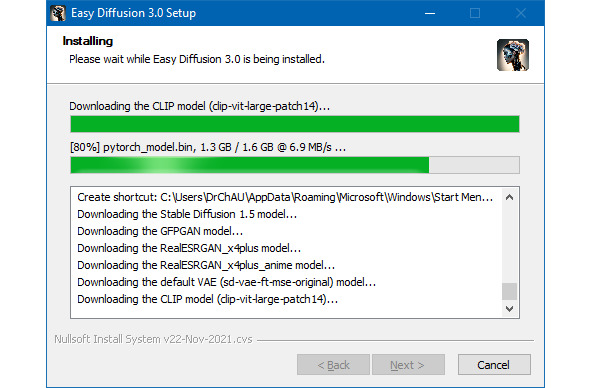
The process of installing and unpacking the files on your computer has begun:
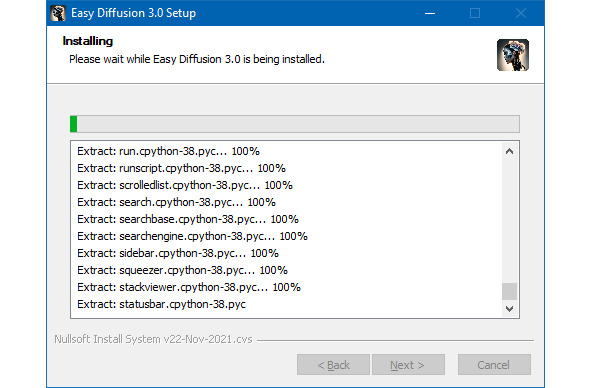
The installation process takes some time.
During this process, the program will install all the necessary files and models for work, including installing the Stable Diffusion model (version 1.5), with which you will create your first works of computer art:
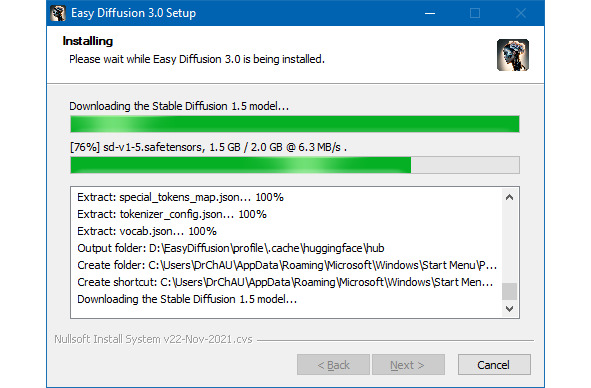
The program will install other auxiliary models (for example, GFPGAN model, Real-ESRGAN model, etc.), which are used by Easy Diffusion to improve the images you create.

At the end of the process, a CLIP model will be established, which allows you to determine how well the generated image matches the query you wrote.
After installation is complete, the following window will appear:
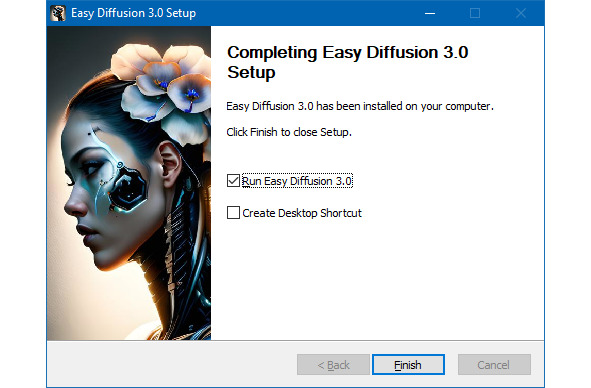
But don’t rush to click the «Finish» button.
Be sure to check the «Create Desktop Shortcut» box and uncheck the «Run Easy Diffusion 3.0» box.

And only now click the «Finish» button.
After completing all the steps, the program will be completely installed on your computer.
Why didn’t we launch the program immediately after installation?
All this is necessary because before we start working with the Easy Diffusion generative Artificial Intelligence system, we need to download and install a few more additional model files that will allow us to create incredibly beautiful images.
What is a model?
A model is a file containing a set of parameters of a trained neural network. The file size can be small or it can be several GB in size. It depends on what a particular model is created and used for.
Each model is trained on a large number of thematic images. A set of images or data is called a «dataset».
There are a large number of different models for creating photorealistic images in various artistic styles. Some models work better for creating anime images, while others work better for imitating famous artists.
To continue working, we need to follow the following links and download the latest versions of the model files with which we will work:
– Realistic Vision версия 5.1
(https://civitai.com/models/4201/realistic-vision-v51);
– DreamShaper версия 8.0
(https://civitai.com/models/4384/dreamshaper);
– Color Fusion версия 1.0
(https://civitai.com/models/20617/color-fusion);
– Midjourney версия 4.0
(https://huggingface.co/prompthero/openjourney/blob/main/mdjrny-v4.ckpt);
– Openjourney версия 4.0 (модель обучена на рисунках Midjourney)
(https://civitai.com/models/86?modelVersionId=27392);
– SDXL Yamer’s Realism! 2.0
(https://civitai.com/models/136669/sdxl-yamers-realism-realisticanime3d).
For example, we need to download the Realistic Vision model file version 5.1.
Follow the link above to the page where there is a model file:
https://civitai.com/models/4201/realistic-vision-v51
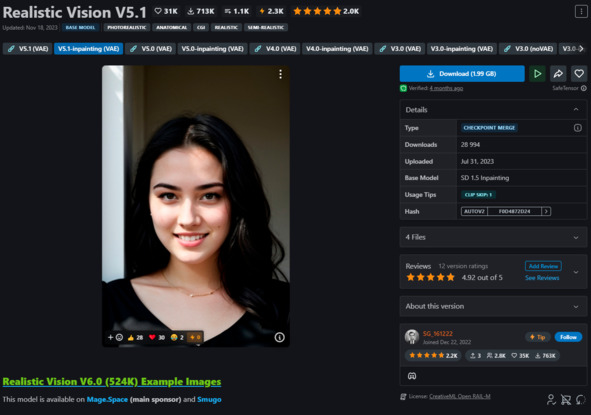
Then we find the file of the latest version of the model for downloading:
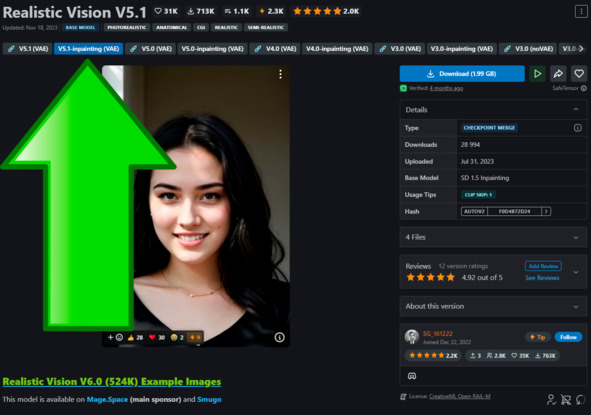
And download the file by clicking the «Download» button:

The realisticVisionV51_v51VAE.safetensors file, 1.9 GB in size, will be downloaded to your computer.
If you do not have an electronic version of the book, you can enter the names of the model files in any search engine and find them on the Internet. For example, upon request «download model Realistic Vision» you will be offered a list of sites for downloading, including the site civitai.com, from which I downloaded most of the files I needed.
After you download all or most of the models offered to you for download, you need to transfer all the files (using the «cut» and «put» commands) to a folder along one of the paths: «C:\EasyDiffusion\models\Stable-diffusion» or «D:\EasyDiffusion\models\Stable-diffusion», depending on where you installed your program.
For this:
– Open the folder on the disk where Easy Diffusion is installed (for example, «C:\EasyDiffusion\” or «D:\EasyDiffusion\»).
– Then find and open the «models» folder.
– In it you will see a folder called «Stable-diffusion». Open it and transfer the model files you downloaded into it.
Congratulations!
You have become the proud owner of your own Easy Diffusion Artificial Intelligence system, installed on your personal computer and supplemented with new models.
Now we can proceed to the first launch.
Step 3. Launch Easy Diffusion for the first time
If immediately after installing the program you selected the «Run Easy Diffusion 3.0» command, as shown in the figure below:

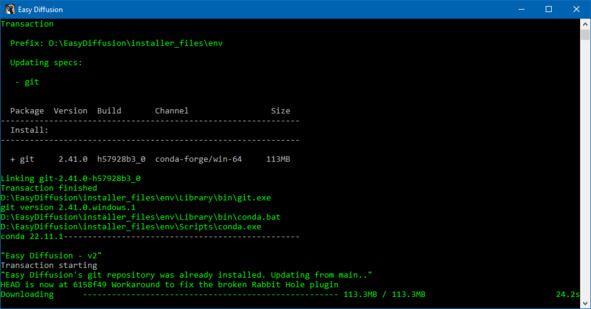
A black window will appear in front of you with running lines of incomprehensible text:

You shouldn’t be afraid of this window, since this is the window where the application itself works, or, more precisely, its server part. This window will always appear when the program starts working. There is no need to close it until you decide to finish your work. Just roll it up.
You need to wait a minute or two (depending on the performance (power) of your computer), after which another window will open in the Internet browser (installed by default). This will be the same Easy Diffusion user interface (or it can also be called the client application of the program), with which we will work throughout the entire time.
Easy Diffusion’s interface is dark, but that’s fixable. In the next chapter we will learn how to make our work more comfortable using program settings.
Thus, when we first launched the program, two windows opened: a window for the server part of the program and a window for the interface.
But don’t rush to get started.
I would recommend that you close both windows and start the program again. This is primarily due to the fact that when you restart the Easy Diffusion program will automatically check for updates, download and install all the necessary new files on its own.
Wait a little longer and your default Internet browser will open again.
After which we can begin with you the next step of work – setting up comfortable and stable operation of Easy Diffusion.
Step 4. Setting up Easy Diffusion
Setting up Easy Diffusion is actually very simple.
By default, the program has options that provide a high level of comfortable work and do not require any changes. However, there are a few that require our attention.
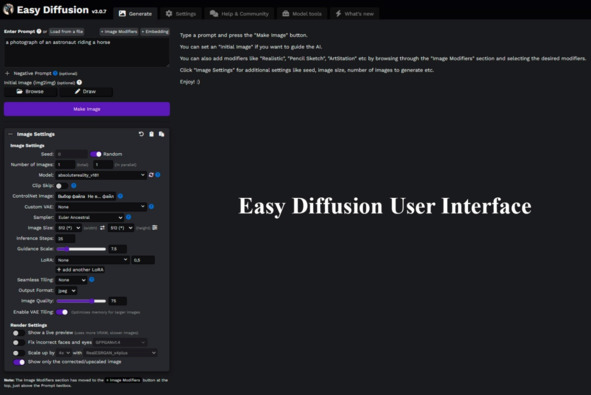
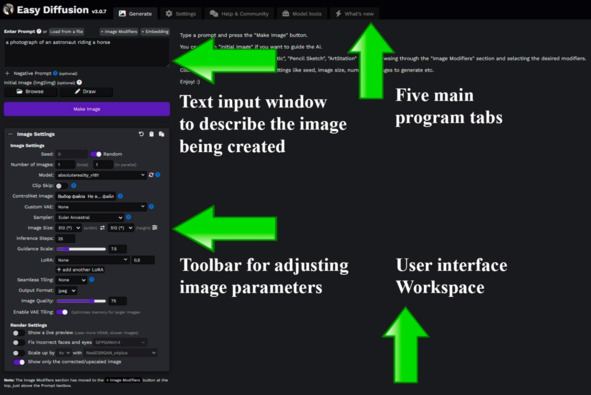
The figure below shows the user interface of the program:
So, let’s get started.
Easy Diffusion has only five main application work window tabs, which are placed one after the other at the top of the user interface work area:
– «Generate».
– «Settings».
– «Help & Community».
– «Models tools».
– «What’s new.»
All our work will take place in the main «Generate» window, which we will devote most of our time to in the next chapter.
In this chapter you will look at the contents of the following bookmarks:
– «Settings».
– «Help & Community».
– «Models tools».
– «What’s new».
«Settings»
To get started, we first need the Settings window.
For your convenience, I will use the «Light» theme of the program:
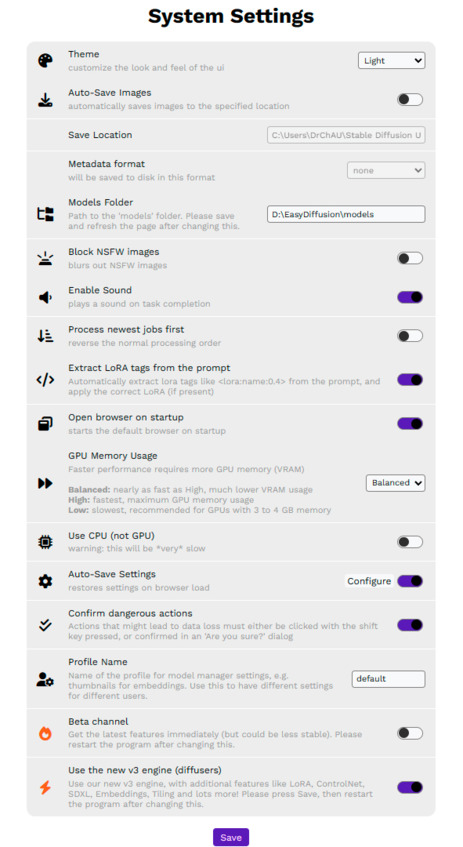
The Settings window provides the following options:
– «Theme». Allows you to change the current theme to the one you like. I’m using the «Light» theme.
– «Auto-Save Images». Let’s activate the option. It allows us to save all our images and descriptions for them in a folder we specify.